


Step 5: Installing Additional Inverters
975-0239-01-01 2–29
Step 5: Installing Additional Inverters
Installation Steps
To install multiple inverters:
1. Disconnect all power from the system.
2. Mount additional inverter(s). See “Step 1: Installing the Mounting Plate” on page 2–4
and “Step 2: Mounting the Inverter” on page 2–6.
3. Install the XW Conduit Box. See “Step 3: Mounting the XW Power Distribution Panel
and XW Conduit Box” on page 2–7.
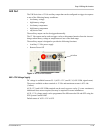
4. Install AC sync cable(s) as required. See “Xanbus and AC Sync Cable” on page 2–38.
5. Install a XW System Control Panel to configure programmable settings and to name
specific network components (e.g., XW1, XW2 etc.). See “The XW System Control
Panel” on page 5–2.
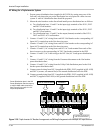
6. Convert the XW Power Distribution Panel to accommodate the extra inverter by
installing the additional breakers and components. See page 2–30 for instructions on
converting the XW Power Distribution Panel to a dual-inverter configuration. See
page 2–34 for converting the XW Power Distribution Panel to a triple-inverter
configuration.
7. Attach Bypass interlock plate to distribution panel cover.
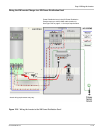
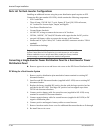
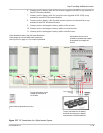
8. Connect DC wiring. See Figure 2-24 on page 2–31 for dual-inverter configurations
and Figure 2-27 on page 2–35 for triple-inverter configurations.
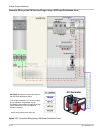
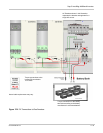
9. Connect AC wiring. See Figure 2-26 on page 2–33 for dual-inverter configurations.
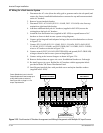
For triple-inverter Configurations, see Figure 2-28, “Triple-Inverter AC Breaker
Arrangement and Wiring Enlargement with Multiple AC Input Sources” on page 2–36
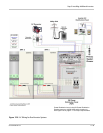
or Figure 2-29, “Triple-Inverter AC Breaker Arrangement and Wiring Enlargement
with a Single AC Input Source” on page 2–37.