


XW Solar Charge Controller Installation
4–14 975-0239-01-01
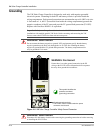
Commissioning
During commissioning, the XW Solar Charge Controller prompts the installer to enter
important system information such as the nominal battery voltage, battery type, and
battery bank capacity. Ensure the system information is available prior to commissioning.
If a XW System Control Panel is present, the XW System Control Panel is intended to be
the configuration interface, so the prompt screens are suppressed. If you prefer to
configure using the prompt screens, disconnect the Xanbus cable connecting the XW
System Control Panel from the XW Solar Charge Controller before powering up for the
first time.
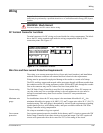
Configuration Screens
When power is first applied to the XW Solar Charge Controller, several configuration
screens prompt you to enter the following information:
• A “DC out” (battery) connection, which enables the XW Solar Charge Controller to
read and share the same battery information with other Xanbus-enabled devices that
charge or invert from the same battery bank.
• Battery type: Flooded (default), Gel, AGM, Custom.
If you select Custom, the settings for battery type match the default settings for
Flooded batteries until you reconfigure the settings on the Custom Battery menu.
• Nominal battery voltage of the battery bank connected to the XW Solar Charge
Controller.
The XW Solar Charge Controller automatically detects battery voltages of 12 V, 24 V
and 48 V. If your nominal system voltage is 36 V or 60 V, enter the correct system
voltage on this screen.
• Battery bank capacity, in amp-hours.
Commissioning Units Using a XW System Control Panel
In systems where an XW System Control Panel (SCP) is present, the SCP is intended to be
the configuration interface. For information about SCP navigation and menus, see
Appendix B, “XW System Control Panel Menus in the XW Inverter/Charger Operation
Guide.
Commissioning units using an SCP involves three separate procedures:
1. Setting the Device Numbers for all XW Solar Charge Controllers.
2. Configuring Connections and Charger Settings for the first XW Solar Charge
Controller.
3. Copying settings from the first unit to the other XW Solar Charge Controller.
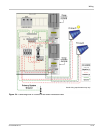
To set the Device Numbers for all XW Solar Charge Controllers:
1. Ensure power is applied to the XW System Control Panel.
2. Close the DC disconnect or use a selector switch to apply battery power to all of the
XW Solar Charge Controllers at the same time. When the XW Solar Charge
Controllers are powered up, they will detect that an SCP is already operating on the
network, and be ready for configuration through the SCP. Do not apply PV power at
this point.