


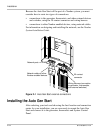


Installing the Auto Gen Start
975-0082-01-01 2–9
Connecting the generator
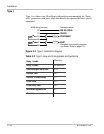
To connect the Auto Gen Start to a generator, you must identify the start
wiring configuration of the generator you want to use. Generators must be
auto-start capable, and generators equipped with remote operation
connections are ideal.
If the generator is equipped for remote operation, you must examine the
wiring of the remote cable and connector (or read your generator’s
documentation, if available) and identify the following wires:
•Ground
•Start
•Stop
• Generator run signal, also known as the Hour Meter or Switched B+
(battery positive)
Wiring
requirements
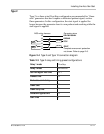
To wire the Auto Gen Start to the generator, you need #16 or #18 AWG
wire connected between contacts 12 to 20 on the wiring harness. How
many of these wires you connect and in which combination depends on
your generator type.
Generator types The Auto Gen Start has 13 preset generator configurations, or “Gen
Types” (see “Gen Type” on page 3–16). To ensure that the Auto Gen Start
is compatible with your generator’s starting circuitry, you must select
your type of generator from the Auto Gen Start menu on the System
Control Panel after completing the installation.
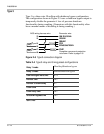
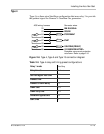
This section describes the generator configurations and provides diagrams
for connecting the wiring harness to the generator’s start wiring.
Important:
You can only change “Gen Type” after you have put the system
into Safe mode. See “Changing System Modes” on page 4–6.
Note: For an explanation of the terminology used in the following section,
refer to Appendix B, “Generator Auto Start Requirements and Types”. For
more information about Auto Gen Start internal relay activity and timing, see
Appendix C, “Relay Timing”.