


Installing the Auto Gen Start
975-0082-01-01 2–5
Installation
overview
Installing the Auto Gen Start involves the following steps:
1. Mounting the unit.
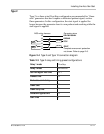
2. Connecting the wiring harness to:
• the generator (page 2–9)
• thermostats (optional) (page 2–23)
• external shutdown switch (optional) (page 2–23)
• external on/off switch and LED (optional) (page 2–23)
3. Connecting the wiring harness to the 20-contact connector on the
Auto Gen Start.
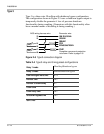
4. Connecting the Auto Gen Start to the System Control Panel and other
network-enabled devices (page 2–26).
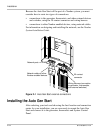
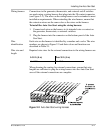
Mounting the unit
The Auto Gen Start is to be mounted vertically on a wall with the
connectors facing downwards.
To mount the Auto Gen Start:
1. Hold the unit flush and square against the wall, panel or horizontal
surface.
• If your mounting surface requires you to pre-drill holes for the
screws, use the supplied mounting template to mark, then drill,
four holes.
2. With a Phillips screwdriver and the supplied #6 screws, secure each
corner of the Auto Gen Start to the mounting surface.
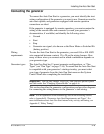
Note: Because each installation varies according to the location, the type of
generator, and the overall complexity of the Xanbus system, these instructions
can offer only general guidelines for the many installation options available.
WARNING: Shock hazard
Before installing the Auto Gen Start as part of a pre-existing Xanbus system, put
the system in Safe mode in order to disable the electrical operation of networked
devices. See “Changing System Modes” on page 4–6.