


Adjustments
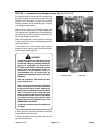
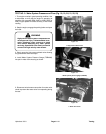
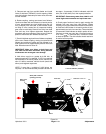
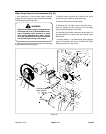
Electric Brake Clutch Adjustment (Fig. 26)
1. Park machine on a level surface, stop the engine,
engage the parking brake, open the hood and discon
-
nect engine spark plug wires.
2. Adjust air gap to .018" by inserting a thickness gauge
into the clutch openings. Evenly tighten the three lock
nuts on clutch to reduce the air gap. Failure to maintain
the correct air gap could result in clutch not engaging
even though it is electrically energized.
NOTE: It may be necessary to remove clutch retainer to
allow clutch rotation for access to all three (3) adjust
-
ment nuts.
Figure 26
1
1. Locknut (3)
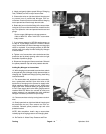
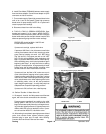
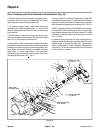
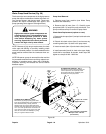
Water Valve Lift Adjustment (Fig. 27, 28, 29)
1. Park machine on a level surface, stop the engine,
engage the parking brake, open the hood and discon
-
nect the engine spark plug wires.
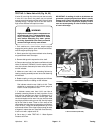
j
High pressure water system components can
cause personal in ury if disassembled incor-
rectly. Discharge water pressure at bleed
valve before attempting any water system
servicing. Open bleed valve slowly and avoid
contact with high velocity water stream.
WARNING
2. Slowly open high pressure bleed valve allowing any
pressurized water to escape.
3. Remove belt guard to expose drive shaft. Remove
gear case cover.
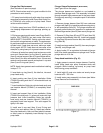
4. Use your hand to rotate coupling assembly, position-
ing working cam on top. Visually inspect top of cam lobe
for wear. There is a thin area on this replaceable cam
that does not contact the cam follower. If cam is worn,
a ridge will develop between tip of cam and unused
surface. If the ridge is deep enough to catch a fingernail,
replace the cam lobe. Do not measure valve lift using a
worn cam lobe. Rotate cam to make sure cam lobe is
not contacting follower.
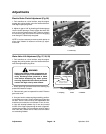
1
2
3
i l is
i
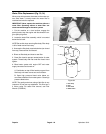
Lead-n to ead-out
two (2) rev. of pinon.
Lead-out
Cam lobe Lead-in portion
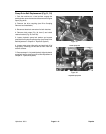
Figure 27
1. Coupling 2. Cam 3. Follower
Adjustments Page 6 - 18 HydroJect 3010