


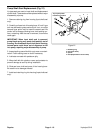
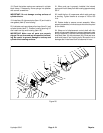


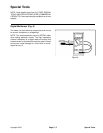

Wheel Motor Repair (Fig. 29)
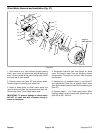
12
11
1
2
3
4
5
6
7
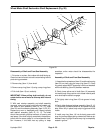
9
10
21
15
16
17
19
20
19
4
13
14
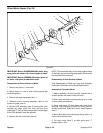
Figure 29
IMPORTANT: Before DISASSEMBLING motor, plug
open ports and clean all dirt from outside of motor.
IMPORTANT: Before ASSEMBLING motor, lightly oil
all seals, rollers and threaded bolt ends.
Disassembly of Cover Section of Motor
1. Remove key (Item 11) from shaft.
2. Mount motor in a vice or other holding device with
shaft facing down.
3. Remove the eight capscrews (Item 1).
4. Remove cover & bearing assembly (Item 2) and
square ring seal (Item 4).
5. Remove IGR assembly (Item 5) starting with outer
locating ring, rollers, outer rolls, inner rotor and valve
plate (Item 7). If any of these components are damaged,
entire IGR assembly must be replaced.
6. Remove the two check balls (Item 6).
NOTE: The check balls may fall into body tapered holes
or into body valve ports during disassembly. Be sure that
the check balls are removed.
Disassembly of Shaft Section of Motor
(See Disassembly of Shaft and Front Seal Assembly
under Main Shaft Seal and/or Shaft Replacement.)
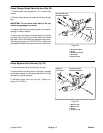
Assembly of Complete Motor
1. Before assembly, all parts must be cleaned with a
suitable solvent and free of nicks and burrs.
2. Mount body with pilot and bearing facing up in a vise
or other holding mechanism.
3. Insert shaft (Item 10) and install seals and thrust
bearings. (See Assembly of Shaft and Front Seal As-
sembly under Main Shaft Seal and/or Shaft Replace-
ment.)
4. Mount body with pilot and bearing facing down in a
vise or other holding fixture.
5. Put rotary valve (Item 7) on shaft spline with “T”
shaped slots on first.
Repairs Page 4 - 24 Hydroject 3010