


Hydroject 3010
Page 6 – 30
Repairs
Rev. B
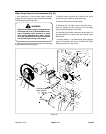
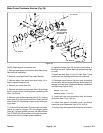
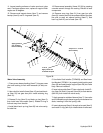
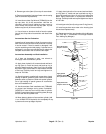
11. Inspect sealing surfaces of valve spool and valve
seat. If surfaces appear worn, replace or regrind. Both
angles are 30 degrees.
12. Remove and inspect sleeve (Item 7) and remove
backup (Item 6) and O–ring seals (Item 5).
13. Remove seal assembly (Items 25–30) by pressing
a socket wrench through the casting. Discard all seal
components.
14. Remove snap ring (Item 21) from gear box pilot
(Item18). Insert a shaft into the outboard side of the gear
box pilot to push out sleeve bushing (Item17), seal
back–up (Item 20) and oil seal (Item 19).
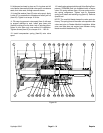
1
2
3
8
11
12
5
6
7
16
17
18
20
19
21
22
23
24
25
26
27
28
29
30
13
14
15
31
32
34
33
35
37
36
38
Torque to 14 – 18 ft–lb
(Six locations)
10 ft–lb
Apply Loctite 271
to threads of spool
Apply grease to
O.D. of sleeve
before installing
Figure 39
Water Valve Assembly
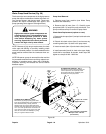
1. Press a new sleeve bushing (Item17) into gear case
pilot until bushing is flush with recessed (oil side) sur-
face.
2. Use a shaft to install oil seal (Item 19) and seal back–
up (Item 20) into gear box pilot. Install retaining ring
(Item 21).
3. Grease O–ring (Item 5) and back–up ring (Item 6),
then install onto valve spool (Item1). Rubber O–ring is
furthest away from threads.
4. Install black back–up ring (Item 30) into valve cavity,
flat side first.
5. Use Valve Seal Installer (TOR4009) and Seal Inser-
tion Mandrel (TOR4011) to properly install packing seal
(Item 29) and seal/plunger support (Item 28) into valve
body. Remove installers.
6. Insert valve guide (Item 27) into valve body. Install O–
ring (Item 24) and U–cup seal (Item 26) to seal retainer
(Item 25), then install into valve cavity.
7. Apply grease to outside of sleeve (Item 7). Use valve
spool inserted through sleeve to gently drive sleeve into
seals, inserting it from the “spring“ side.
8. Insert valve spool (Item1) through valve seat (Item 2)
and install O–ring (Item 3) on inboard side of valve seat.