


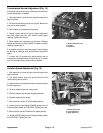
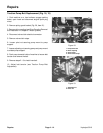

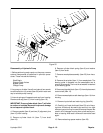
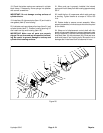
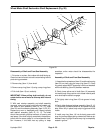

Charge Pump Service (Fig. 24)
1. Use a 5 mm internal hex wrench to remove the two
(2) screws holding charge pump cover to pump end cap.
NOTE: Charge pump rotation is determined by orienta-
tion of charge pump cover on pump end cap. Cast boss
on charge pump cover indicates orientation. Note orien-
tation of cast boss before removing charge pump cover.
2. Remove charge pump cover and O-ring.
3. Remove charge pump gerotor assembly.
4. Remove charge relief valve spring and ball.
5. Inspect gerotor assembly, charge pump cover and
end cap for abnormal wear, damage or foreign material.
Inspect charge relief valve seat in end cap for damage
or foreign material.
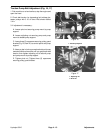
6. Before installing charge pump, apply a small amount
of petroleum jelly to inside diameter, outside diameter
and slide faces of gerotor assembly.
7. Install charge relief ball and spring.
8. Install charge pump gerotor assembly.
9. Install charge pump cover and O-ring. Make sure
charge relief spring enters recess in cover.
10. Install charge pump cover screws and tighten to a
torque of 84 to 120 in-lb.
2
4
1
installed in machine
3
5
84 to 120 in-lb.
Top of pump when
Torque to
Figure 24
1. Charge pump cover
2. O-ring
3. Gerotor assembly
4. Charge relief ball
5. Charge relief spring
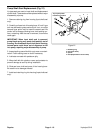
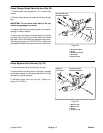
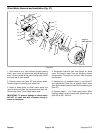
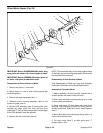
Major Pump Repair (Fig. 25, 26)
The procedures on the following pages are for complete
disassembly and reassembly of the pump.
Cleanliness is a primary means of assuring satisfactory
transmission life, on either new or repair units. Cleaning
parts by using a clean solvent wash and air drying is
usually adequate. As with any precision equipment, all
parts must be kept free of foreign materials and chemi-
cals. Protect all sealing surfaces and open cavities from
damage and foreign material.
During assembly of the pump, all surfaces which have
relative motion between two parts should be coated with
a film of clean hydraulic oil. This will assure that these
surfaces will be lubricated during start-up.
It is recommended that all gaskets, o-rings and seals be
replaced. Lightly lubricate all o-rings with clean petro-
leum jelly before assembly. All gasket sealing surfaces
must be cleaned before installing new gaskets.
Repairs Page 4 - 18 Hydroject 3010