


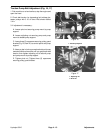

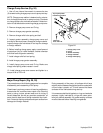


18. Check that piston springs are centered in cylinder
block bores, If necessary, move springs into position
with a small screwdriver.
IMPORTANT: Do not damage running surfaces of
cylinder blocks.
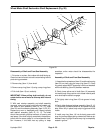
19. Install two (2) alignment pins (Item 15) and install a
new gasket (Item 6) onto housing.
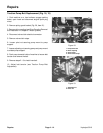
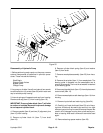
20. Lubricate running surfaces of end cap (Item 31) and
cylinder blocks (Item 7). Position housing opening UP
and install end cap onto housing (Item 18).
IMPORTANT: Make sure all parts are properly
aligned. Do not force end cap into position on hous-
ing. Be careful to prevent damage to end cap and
cylinder block sealing surfaces.
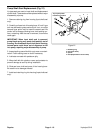
21. When end cap is properly installed, the internal
springs will hold it away from the housing approximately
3/8 in.
22. Install the four (4) capscrews which retain end cap
to housing. Tighten screws to a torque of 138 to 180
in-lb.
23. Rotate shafts to assure correct assembly. When
properly assembled, minimal torque should be required
to turn shafts.
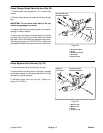
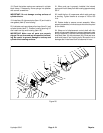
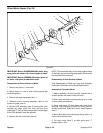
24. Wrap end of displacement control shaft with thin
plastic or use a seal protector to prevent damage to seal
during installation. Lubricate new displacement controls
shaft seal (Item 16) with petroleum jelly. Slide seal over
shaft and press it into housing bore. Be careful not to
damage seal. Install seal flush to bottomed in bore.
24
23
22
21
20
19
16
18
5
26
27
28
29
25
6
7
8
9
10
35
36
37
38
39
11
12
13
14
15
17
1
2
3
4
40
34
33 31 32
30
4
3
2
1
Figure 26
Hydroject 3010 Page 4 - 21 Repairs