


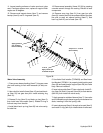


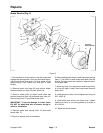


8. Remove gas valve (Item 4) from top of accumulator.
9. Remove accumulator from top of water valve housing
(see Accumulator Replacement).
10. Insert Accumulator Cap Wrench (TOR4003) into the
top cap (Item 12) of the accumulator. Hold the ac
-
cumulator cylinder (Item 6) stationary using a strap or
chain wrench and remove the top cap (Item 12) and
bottom cap (Item 9) of the accumulator.
11. Use a brass or aluminum shaft to force the piston
(Item 8) out of top side of accumulator and discard the
piston.
Accumulator Service Evaluation
Inspect bore of accumulator cylinder for score marks or
wear. If barrel of accumulator is not scratched or scored,
it can be reused. If bore is scored or damaged, it will
require resurfacing and nickel plating. If cylinder bore is
damaged, it may be more cost effective to replace the
complete accumulator than to continue this repair.
Accumulator Assembly and Seal Installation
12. If bore not damaged or worn, use solvent to
thoroughly clean accumulator cylinder.
13. Apply clean hydraulic oil to new end seal and back-
up ring (Item 4). Install end seal and back-up ring in
groove of bottom end cap (Item 9) so O-ring is toward
the piston. Apply “Never-Seez” or equivalent to threads
of end cap. Carefully install end cap and tighten to a
torque of 125 ft-lbs.
14. Special grease is supplied with a new piston. Apply
coating of special grease to piston. Make sure spaces
between seals on piston are filled with special grease.
Put a light coating of special grease on accumulator
bore and installation tool.
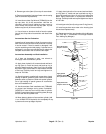
15. Use Accumulator Seal Installation tool (TOR4002)
to prevent seal damage during piston installation.
CAREFULLY insert this tool into top side of cylinder.
SLOWLY insert piston (large cross facing down) through
the tool and into the cylinder bore.
16. Move piston to bottom of accumulator cylinder. Add
11 oz. of Mobil DTE 26 hydraulic oil to completely fill cup
in piston and cover top edges of piston.
17. Apply clean hydraulic oil to new end seal and back-
up ring (Item 4). Install end seal and back-up ring in
groove of top end cap (Item 12) so O-ring is toward the
piston. Apply “Never-Seez” or equivalent to threads of
end cap. Carefully install end cap and tighten to a torque
of 125 ft-lbs.
18. Install gas valve (Item 3) using a new O-ring (Item 4).
19. Install accumulator onto water valve housing (see
Accumulator Replacement).
20. Charge accumulator gas chamber with dry Nitrogen
(see TEST NO. 1: Accumulator Pre-Charge Pressure
Test / Adding Dry Nitrogen).
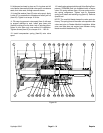
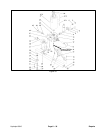
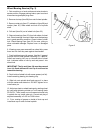
1
2
3
4
5
6
7
8
9
10
11
13
4
4
12
Apply special
grease to piston
and cylinder bore
Apply Never-Seez
Torque to 125 ft-lb.
Apply Never-Seez
Torque to 125 ft-lb.
Figure 46
HydroJect 3010 Page 6 - 37 (Rev. A) Repairs