


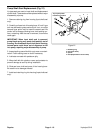
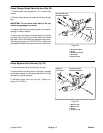
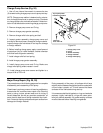
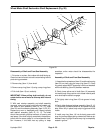
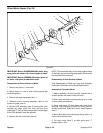


Wheel Motor Shaft Seal and/or Shaft Replacement (Fig. 28)
12
11
1
2
3
4
5
6
7
9
10
21
15
16
17
19
20
19
4
13
14
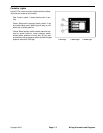
Figure 28
Disassembly of Shaft and Front Seal Assembly
1. Put motor on a clean, flat surface with shaft facing up.
Clean front end of motor to avoid contaminating internal
parts during procedure.
2. Remove key (Item 11) from shaft.
3. Remove snap ring (Item 14) using a snap ring pliers.
4. Pull shaft (Item 10) out vertically.
IMPORTANT: When pulling shaft vertically, do not
rotate shaft or move motor as this may alter internal
timing.
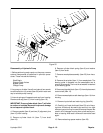
5. With seal retainer assembly and shaft assembly
removed, remove all parts from shaft and inspect vari-
ous parts of seal assembly (Item 15, 16, 17), shaft
(Item 10) and thrust bearing assembly (Item 19, 20, 21).
Replace any worn or damaged parts. Always replace
seal retainer assembly (Item 15, 16, 17). The shaft
should have smooth polished surfaces in bearing and
seal areas. If the shaft is lightly scratched in these areas,
polish with fine emery paper in a circumferential direc-
tion. However, if the shaft has any pitting or deep
scratches, entire motor should be disassembled for
inspection.
Assembly of Shaft and Front Seal Assembly
1. Assemble thrust washers (Item 19) and thrust bearing
(Item 20) on shaft using the snap ring (Item 21). Snap
ring sharp edges MUST face away from thrust washers
with thrust bearing (Item 20) between washers.
2. Slowly lower spline end of shaft (Item 10) assembly
into motor body using caution not to rotate internal parts
once shaft spline starts to engage.
3. Put lightly oiled o-ring (Item 12) into groove in body
bore.
4. Gently slide oiled seal retainer assembly (Item 15, 16,
17) over shaft, chamfered side first, and press into body
bore. When fully in place, body snap ring groove will be
visible.
5. Install snap ring (Item 14) into its body groove with
snap ring’s sharp edges facing outward and retainer pin
between snap ring lugs. Be sure snap ring is completely
seated in groove.
Hydroject 3010 Page 4 - 23 Repairs