


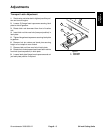
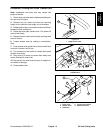
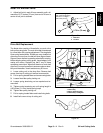
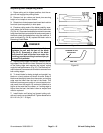

Install Lift Arm Ball Joints
1. Adjust ball joint in each lift arm assembly until a di-
140 ft–lb (19 Kgm)
mension of 2.75 inches (70 mm) from end of lift arm to
center of ball joint is attained.
1
2
2.75 in. (70 mm)
then continue tightening
until slot in nut aligns
with cotter pin hole
84 inch
Cutting Units
Figure 18
1. Ball Joint
2. Lift Arm
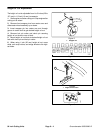
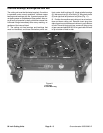
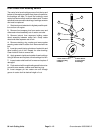
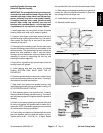
Drive Belt Replacement
The blade drive consists of three belts, one main drive
belt and two wing belts. The main drive belt is tensioned
by a fixed idler with a spring adjustment. The wing belts
have spring loaded idlers. All belts are very durable but
after many hours of use, the belt will show signs of wear.
Signs of a worn belt are: squealing when belt is rotating,
blades slipping when cutting grass, frayed edges, burn
marks and cracks. Replace any belt if any of these
conditions are evident. Adjust belt tension on main belt
after first 5 hours of operation to assure maximum dura-
bility and thereafter, check tension every 50 hours.
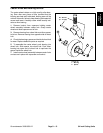
1. Lower cutting unit to the shop floor. Remove belt
covers from top of cutting unit and set covers aside.
2. Pull on spring loaded idlers and remove wing belts.
3. Loosen fixed idler pulley locking nut.
4. Loosen spring tensioning nut as required and re-
move belt.
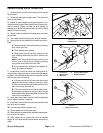
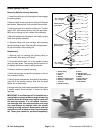
5. Tighten spring tensioning nut until spring length is
4.35 inches (111 mm) inside spring loops.
6. Tighten idler pulley locking nut.
7. Pull on spring loaded idlers and install wing belts.
8. Install belt covers to top of cutting unit.
1
3
2
4.35 in. (111 mm)
Figure 19
1. Idler Pulley
2. Spring Tensioning Nut
3. Idler Pulley Locking Nut
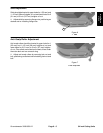
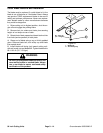
Figure 20
Groundsmaster 3000/3000–D
Page 9 – 11
Rev. A
84 inch Cutting Units