


SECTION 12: SERVICING
43
SECTION 12: SERVICING
12.1 Servicing Instructions
After commissioning, the heater will require
maintenance to be carried out annually. If the heater
is used in a dirty or dusty area, more frequent
maintenance may be necessary.
Installation, Service and Annual Inspection of the
heater must be done by a contractor qualified
in the installation and service of gas or oil-fired
heating equipment.
NOTE 1: After any maintenance or repair work,
always test fire the heater in accordance with the
commissioning instructions on Page 33, Section 10
through Page 39, Section 10.10 to ensure all safety
systems are in working order before leaving the
heater to operate. Minor faults may be traced by
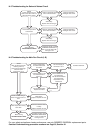
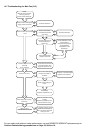
using the troubleshooting charts on Page 45,
Section 14 through Page 50, Section 14.7.
NOTE 2: Check all fuel pipes and pipe joints to
ensure there are no cracks or gas leaks. Any cracks
in the pipes or pipe joints must be repaired.
NOTE 3: Inspect all suspended components and
hardware. Insure that they are in good condition,
properly tightened, and corrosion free.
12.2 Burner Maintenance
1. See the manufacturer’s information for specific
instructions.
2. Clean the fan (and fuel filters, when fitted).
Inspect all components, including the flame
monitoring and ignition system, and correct
operation of fuel control valves.
3. For oil-fired burners it is recommended that the
atomising oil nozzle be replaced during the
annual service.
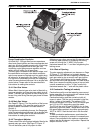
12.3 Fan/Motor Assembly Maintenance (all
models)
The main fan bearings are permanently sealed and
do not need lubrication. Before cleaning, turn off fuel
and electrical supply. Remove the heater side
panels and use a small brush or duster to clean the
fan blades from each side. Replace panels when
done.
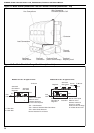
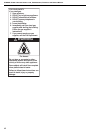
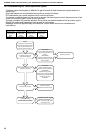
Figure 21: Belt Tension
Check the condition and tension of the drive belts.
The condition is best inspected with the belts
removed. Check for chaffing or lateral cracks.
Replace belts as a matched pair as necessary.
Do not over-tighten belts, as this may cause bearing
damage.
12.4 Heat Exchanger Maintenance
Ensure that the front collector box is clean and that
the turbulators fitted to the tubes are in good
condition.
Also inspect the joint between the heat exchanger
and the flue to ensure that it is still sealed.
1. If maintenance is needed, remove the burner.
See Page 51, Section 15.1.
2. Remove the upper front panel.
3. Remove the front cover of the heat exchanger.
4. Remove and inspect the turbulators.
5. Clean out any deposits from flue ways and the
combustion chamber, using a vacuum cleaner
and brush. Inspect the combustion chamber
and heat exchanger for damage or corrosion.
6. Any damage must be referred to
Roberts-Gordon.
7. Replace components in reverse order to above
- replacing gasket material and any damaged
turbulators.
8. Inspect and repair any damage to the seal
between the flue and the flue spigot.
12.5 Thermal Insulation
While the upper panels are removed for heat
exchanger servicing, the thermal insulation fitted to
all the upper panels must be inspected. Insulation
should be sound, with the foil face in good condition.
If any thermal insulation is in poor condition, then it
must be replaced with new insulation material and
suitably sealed at the edges with adhesive foil tape.
WARNING
Cut Hazard
Turn off fuel and electrical supply before maintenance.
Fan can start automatically at any time.
Failure to follow these instructions can result in severe
injury or product damage.
Motor
Pulley
Fan
Pulley
8 mm to 10 mm