


40
Section 5: Maintenance & Lubrication
RCB6610 & RCBM6610 Series 2 S/N 944730+ Rotary Cutters 330-584M
11/11/12
Table of Contents
Section 5: Maintenance & Lubrication
General Maintenance Information
Proper servicing and adjustments are key to the long life
of any implement. With careful inspection and routine
maintenance, you can avoid costly downtime and repair.
The parts on your Rotary Cutter have been specially
designed and should only be replaced with genuine Land
Pride parts. Do not alter the cutter in a way which will
adversely affect its performance.
Check all bolts and pins after using the cutter for several
hours and on a regular basis thereafter to ensure they are
tight and secured. Replace worn, damaged, or illegible
safety labels by obtaining new labels from your Land
Pride dealer.
!
DANGER
Perform maintenance only on a cutter that is not running.
Disengage PTO, place tractor in park or set park brake, shut
tractor engine off, remove switch key, and wait for blades to
come to a complete stop before dismounting tractor to perform
maintenance.
!
WARNING
To avoid serious injury or death:
• Frequently check all hardware to make certain it is tight and
not broken or missing. Such hardware can cause the cutter to
not perform properly and may lead to breakage that can cause
bodily injury or death.
• Do not operate cutter with loose pins, bolts, or nuts. Loose
hardware can result in a serious breakdown causing bodily
injury or death.
!
CAUTION
To avoid serious injury:
• Do not alter Land Pride equipment or replace parts with
other brands. Doing so can cause equipment to perform
improperly and may lead to breakage that can cause bodily
injury. Replace parts only with genuine Land Pride parts.
• Maintain proper gearbox oil level. Improper oil level can
cause bearing failure and be a fire hazard.
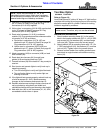
Tractor Maintenance
One of the most important things you can do to prevent
hydraulic system problems is ensure that your tractor's
reservoir remains free of dirt and contamination.
Use a clean cloth to wipe hose ends before attaching
them to your tractor. Replace your tractor’s hydraulic filter
element at the prescribed intervals. These simple
maintenances will go a long way to prevent occurrence of
control valve and hydraulic cylinder problems.
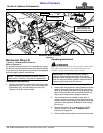
Skid Shoes & Side Skirt
!
CAUTION
Excessive wear on skid shoes may cause inadequate operation
of cutter and create a safety hazard.
Two skid shoes are mounted on the center section and
one skid shoe mounted on the wing section. Check all
skid shoes for wear and replace if necessary. Order only
genuine Land Pride parts from your local Land Pride
dealer.
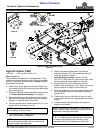
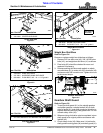
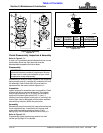
Center Skid Shoes
Refer to Figure 5-1 on page 41:
1. Remove 5/8" hex whiz nuts (#4), 5/8" hex bolts (#3)
and skid shoes (#1) from center deck (#2).
2. Attach new skid shoes (#1) to cutter with existing
5/8" hex bolts (#3) and secure with 5/8" hex whiz
nuts (#4). Tighten whiz nuts to the correct torque.
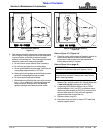
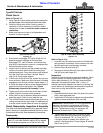
Wing Skid Shoe
Refer to Figure 5-2 on page 41:
1. Remove 3/8" whiz nuts (#5A), carriage bolts (#4),
and hardened skid shoe (#2) from the wing deck.
2. Remove 3/8" whiz nuts (#5), plow bolts (#3), and
wing skid shoe (#1) from the wing deck.
3. Discard worn skid shoe.
4. Inspect plow bolts for wear and replaced if needed.
5. Attach new hardened skid shoe (#2) to cutter side
panel with removed 3/8"-16 x 1 1/4" GR5 carriage
bolts (#4) and whiz nuts (#5A). Do not torque nuts
tight at this time.
6. Attach new skid shoe (#1) to cutter side panel with
new/existing 3/8" -16 x 1 1/4" GR5 plow bolts (#3)
and hex whiz nuts (#5).
7. Tighten whiz nuts (#5 & #5A) to the correct torque.
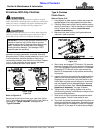
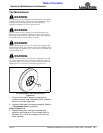
Side Skirt With Skid Shoes Attached
Refer to Figure 5-3 on page 41:
1. Remove existing hex whiz nuts (#3), carriage
bolts (#2), and side skirt (#1).
2. Attach new side skirt to cutter with 1/2" -13 x 1 1/4"
GR5 carriage bolts (#2). Secure with new 1/2" hex
whiz nuts (#3). Tighten nuts to the correct torque.
NOTE: Side Skirt assembly part number includes
side skirt, skid shoes, decals & mounting hardware.