


28
Section 2: Adjustments
RCB6610 & RCBM6610 Series 2 S/N 944730+ Rotary Cutters 330-584M
11/11/12
Table of Contents
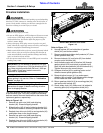
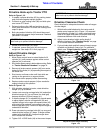
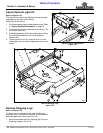
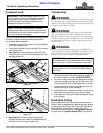
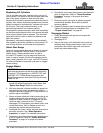
Cutting Height Adjustment
Refer to Figure 2-5:
1. At the cutting site, unfold wings and raise center deck
fully up with lift cylinder (#1). See instructions for
“Unfolding Wing Deck” on page 18.
2. Shut tractor down properly before dismounting. Refer
to “Tractor Shutdown Procedure” on page 14.
3. Remove all stroke control spacers (#4) from center
hydraulic cylinder (#1) by spreading them apart at
the break line. Store spacers in a location they can be
retrieved.
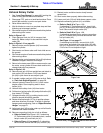
4. Start tractor and engage blades. See instructions for
“Engage Blades” on page 34.
5. Using tractor control lever, adjust cutter to the desired
cutting height and then travel forward for
approximately 20 to 50 feet.
6. Shut tractor down properly before dismounting. Refer
to “Tractor Shutdown Procedure” on page 14.
7. Measure height of cut grass/material. This distance
is the cutting height. If this height is acceptable,
continue with step 8. If this height is unacceptable,
repeat steps 4 to 7 until desired height is achieved.
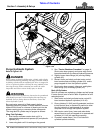
8. Select required size and number of stroke control
spacers (#4) that will fit on the center hydraulic
cylinder rod. The following spacers are available.
• (#1): Two 1" spacers
• (#2): One 1 1/4" spacer
• (#3): One 1 1/2" spacer
• (#4): One 1 3/4" spacer
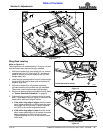
9. Return to the tractor and raise Rotary Cutter up
again. With tractor shut off and switch key removed,
install selected stroke control spacers on the center
hydraulic cylinder rod. Do not install spacers on the
wing rephasing cylinders.
10. Return to tractor and lower cutter against stroke
control spacers. Recheck cutting height in steps
4 to 7. If needed, adjust size and quantity of stroke
control spacers until desired height is achieved.
11. Keep remaining spacers with tractor for field
adjustments.
NOTE: Make all cutting height adjustments in the
field using height of cut grass/material as a guide.
Do not measure blade height above ground as the
non-operating blade height will be different than the
operating blade height.
NOTE: Removing spacers lowers the cutting height
and adding spacers raises the cutting height.
Cutting Height Adjustment
Figure 2-5
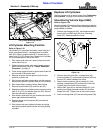
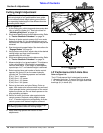
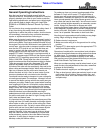
LP Performance Hitch Hoe Size
Figure 2-6
LP Performance Hitch Hole Size
Refer to Figure 2-6:
The LP Performance hitch is designed to receive
1" diameter hitch pins. To convert the hitch to receive
1 1/4" diameter hitch pins, knock out upper and lower
bushings (#1) in clevis (#2).
26611