


Section5: Maintenance
HI--IBb
Before inspecting,cleaningor servicing the machine, shut off engine, wait for all moving partsto come
to a completestop, disconnect spark plugwire and move wire away from spark plug. Remove ignition
key, if so equipped.
Failureto follow these instructionscanresult in serious personalinjuryor propertydamage.
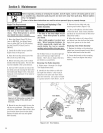
Adjusting Reverse Drive:
1, PlaceWheeis/Tines/PTODrive Leverin
FORWARDposition.
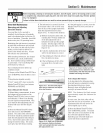
2, Onieft side of tiiier, put a 1/2"wrench
on the piunger retaining boit andanother
1/2"wrench on the jam nut next to it
(Figure5-27). Whiie hoiding the boit
steady, ioosenthe jam nut (counterclock=
wise) until it touchesthe bolt head.
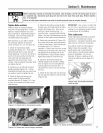
Figure 5-27: Hold bolt steady while
loosening or lightening jam nut.
3. Turn the bolt in until it tightens against
the piunger insidethe spring. The boit
must be tigirt to preventpiunger from
turning - but be careful not to overfighten
and breakthe boll
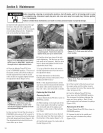
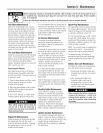
4. Piacea7/8" wrench on the head of the
reverseadjustment boit and a 9/16"
wrench on the jam nut belowit (Figure5o
28). Hoid the boit steadywhiie ioosening
the jam nut three or four turns.
5. Movethe Wheels/Tines/PTODrive
Leverto NEUTRAL.Theswitch body on
the bottom of the engine mount tab
(Figure5°24) shouid be resting squarely
on top ofthe reverseadjustment bolt, and
the reversedisc shoutd beat ieast 3/16"
away from tire transmission drive puliey.
If the reversedisc is any closer than this,
raisethe reverseadjustment boit (turn it
counterclockwise).
6, Checkthat reversedisc is at ieast 3/16"
away from transmission drive puiiey.
Then hoid reverseadjustment boit steady
with one wrench whiie tightening jam nut
with a secondwrench (Figure5-28).
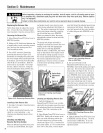
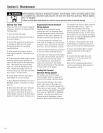
7, Placea chalk or pencil mark on the top
edgeof the plunger retaining bolt. Now,
while watchingthe mark,ioosen the boit
3/4-turn (Figure5-29). Do not exceeda
3/4 tuns (this would disengagethe bolt
from the iocking groove in the sideof the
plunger).
Figure 5-28: Loosen jam nut before
turning reverse adjustment bolt.
8. Holdthe plunger retaining bolt steady
with a wrench while tightening thejam
nut againstthe side ofthe plungerhousing
(Figure5=27).
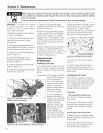
Figure 5=29: Loosen plunger
retaining bolt about 3/4-turn, then
tighten jam nut against plunger
housing.
9. Checktheaction of the reversedisc as
explainedpreviously.
J[VIPORTANT:If the above adjustments
havenot corrected an improperly working
reverse drive, contact an authorized
dealer or Factory Technical Service
Departmentfor assistance.
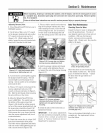
Bole Tine IVtaintenance
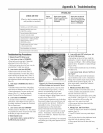
CheckingTinesfor Wear
Inspect the tines for wearor damageafter
every30 operating hours= Therate of
weardependsupon hours of useand soil
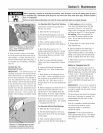
conditions. With use,thetines get
shorter, narrower and morepointed
(Figure5-30)= If badiyworn, they losethe
ability to tiii deepiy=
Figure 5-30: Cheek for wear
every 30 operating hours.
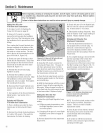
Worn tines ieavean ever=increasinggap
in the middle of atiiied row=The normal
gap is 3"betweenthe tinetips -repiace
thetines whenthe gap widens to 5"
(Figure5=31)=
Figure 5-31: Replace fines when gap
H
between inner tines is 5 or more
(normal gap is 3J').
Tinescan be replacedindividualiy or as a
compieteset= Seereplacementinstruc=
tions that follow=
37