


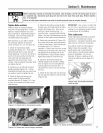
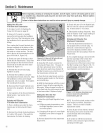


Section5:
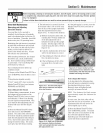
Before inspecting,cmeaningor servicing the machine, shut off engine,wait for all moving partsto come
to a complete stop, disconnect spark plug wire and move wire away from sparkplug. Remove ignition
key, if so equipped,
Failureto follow these instructionscan result in serious personalinjury or propertydamage.
Adding Gear Of/to the
PTOPower Unit Transmission
1. Dosteps 1 and 2 of Checkingthe
PowerUnit OL/Leve/on page32=
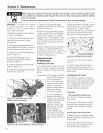
2. Using a 3/4" wrench (or socket),
removethe boIt securing the handlebar
baseto the top ofthe transmission (prop
the handlebarsfirst to prevent them from
falling).
Then, unpiug tire ForwardInterlock wire
harness receptacleat the bottom ofthe
handlebars. Setthe handlebar baseand
boit asideon a cleansurface. The bolt
hoie in thetop of the transmission isthe
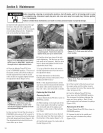
gear oiI filI hole (A,Figure5=9)=
3. Slowly pour gear oiI through aclean
funnel into the transmission. Stop when
gear oil beginsto flow from the oii ievet
check hoteon the ieft side of the transo
mission (B, Figure5=7)=
4. Reinstalithe oii ievelcheck plug.
Tighten it securely.
5. Reinstalithe handlebarsusing the
mounting boit previously removed. Align
the handlebarssothey point straigirt
backwards,not at an angte=Thentighten
the mounting bolt securely.
6. Reconnectthe Forward Interlock wire
harnessto the receptacle. Becertain it's
secure=
7, Test operationof the Forward Interlock
SafetySystem. SeeSection 4 for a
procedure.
Draining and Filling the
PTOPower Unit Transmission
1. Piaceashaiiow pair underthetrans-
mission gear oil drain plug (B, Figure
5=9).
2. Removethe oii levelcheck plug (Figure
5-7) with a 3/8"wrench. This ventsthe
transmission for faster oil draining.
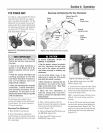
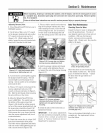
Figure 5=9:Gear off fill hole (A) and
gear off drain location (B).
3. Using the 3/8" wrench, removethe
drain plug (B, Figure5-9). The gear oil
wiii drain quiteslowly since it isthick.
After abouttwo quarts havedrained,tiit
the tiiier forward soany oii attire rear of
the transmission will drain out=
4, Cleanthe drain plug threads, put non=
hardeninggasketsealant on thethreads,
and reinstall piug=
5. Refiii the transmission with the correct
amount of gear oii beforeoperatingthe
tiiier again=When oii seeps from the oii
leveicheck hoie,the right amount of gear
oil has beenadded= ReplacealIplugs=
Adding 8ear Oil to the Tine
Attachment Transmission
1. Selectthe right Depth Reguiator Lever
setting:
a. If fiiiing an empty transmission, raise
the Depth Regulator Leverso tines
are on the ground=
b. If topping off the gear oii, moveDepth
Regulator Leverdown to engage its
top notch.
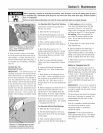
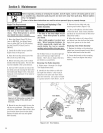
2. Removedipstick from tine attachment
(Figure5=8),
3. Slowly add gear oiI in the dipstick hole.
Add 1/2=ounceat a time to avoid overfill-
ing. It takesabout 12=1/2ounces.
4. Takedipstick readingsfrequently. Stop
whenoii reactres"Coid" rangemarking on
dipstick. Replacedipstick securely.
Braining and Fifling the Tine
Attachment Transmission
1, Thetine attachmenttransmission is
not equippedwith an oii drain plug. To
drain just a small amount of gear oiI,
removethe dipstick and tiit the attach-
ment forward (first uncoupling it from the
PowerUnit).
2. Forcompiete drainage,remove the ieft-
sidetine assembly (refer to BoloTine
Naintenancefor instructions), then
removejust one of the iowerscrews from
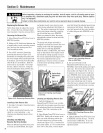
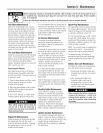
the tiiier housing cover (Figure5-10). To
speeddrainage, removethetine attach-
ment dipstick to vent transmission.
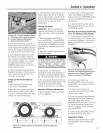
Figure 5-10: Remove housing cover
screw to drain tine attachment
transmission gear oil
NOTE: if you find a plastic washer on the
cover screwyou remove,discard the
washer. Thereis no needto install a
repiacementwasher.
3. Onceali gear oii has drained,reinstali
the housing cover screw secureiy (first
coat its threads with non-hardening
gasketsealant).
4. Becertain to refiii thetransmission
with the correct amountof gear oil before
operatingthe tiller again.
32