


ASSEMBLY
Assembly Section 3-3
© 2004 Alamo Group Inc.
SR10M/SR15M 10-01
ASSEMBLY
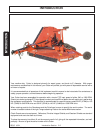
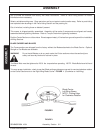
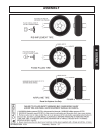
TONGUE ATTACHMENT
Long Tongue FIGURE A
To assemble the long tongue. Align the lugs of the tongue with the top holes of the mainframe hitch plate (1).
Insert the pivot pin (2) and fasten with 2 - 3/8" x 1 1/4" bolt (3) and 3/8" locknut (4). To assemble the control rod
install a jam nut onto the short rod (5), then thread the short rod (5) into the long rod (6). Align the hole of the
short control rod (5) to the top hole of the center lug on the mainframe (7). Insert pin and lock with cotter pins.
Align the hole of the long rod (6) to the clevis hitch (8) and insert pin with cotter pin (9).
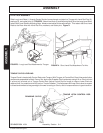
Short Tongue FIGURE B
To assemble the short tongue align the tongue with the lower holes of the mainframe hitch plate (10). Insert the
pivot pin (11) and fasten with 2 - 3/8" x 1 1/4" bolts (12) and 3/8" locknut (13). Align the control rod (14) to the
lower hole of the center lug on the mainframe (15). To attach the control rod follow the same procedure as
stated in the long tongue.
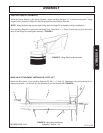
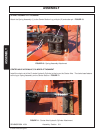
FIGURE 2. Axle Attachment
CENTER AXLE ATTACHMENT- LEVEL LIFT & NON LEVEL LIFT
Install Center Axle (1) to lugs (2) at rear of Center Section with (2) 1" x 7" lg. bolts (3), and locknuts (4). Figure 2.
4
3
2
1
1
2,3,4
7
14
15
10
10
5
8
9
11,12,13
6
Long Tongue
Assembly
FIGURE A
FIGURE B
Short Tongue
Assembly