


© 2006 Alamo Group Inc.
Section 4 - 5
Axtreme Boom (Asy. Man) 07/06
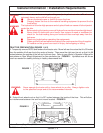
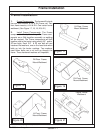
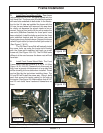
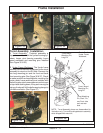
5. Install the new mount brackets to the tractor
frame. (If Required, See Assembly Drawings sent
with unit) The tank mounting brackets will bolt to the
tractor the same as the factory brackets that were
removed. Make certain that the brackets are installed
correctly, the front bracket will have 2 outer holes
(same as the tank see Figure 11 & 13). The rear
bracket will have 1 hole in the outer end (same as the
tank, See Figure 12 & 13)
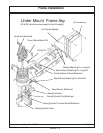
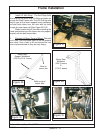
6. Install The new Fuel tank onto Tractor if
required.(If Required, See Assembly Drawings sent
with unit) The new fuel tank with the gauge sending
unit slide in on top of the new mounting brackets with
the fuel cap to the front (See Figure 14). Connect lines
to fuel pick up connections, connect wiring to fuel
gauge sending unit. (See Figure 14)
7. Bolt Tank to the Mounting Brackets.(If Re-
quired, See Assembly Drawings sent with unit) Bolt
the tank to the mounting brackets, there are two bolts
in the front bracket and one bolt in the rear bracket.
(See Figure 15)
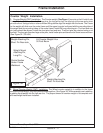
8. Install New replacement Step.(If Required,
See Assembly Drawings sent with unit) The new
Replacement step is a bolt on weldment that will bolt
to the new fuel tank with four bolts, note: below the
step is painted yellow for clarity only (See Figure 16).
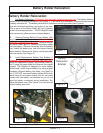
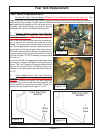
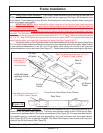
Figure 13
Pick Up Tube Unit
Front
Rear
Mounting
Tabs
Tank
Figure 14
Front
Bracket
(2 Bolts)
Rear
Bracket
(1 Bolt)
Figure 15
Figure 16
Fuel Tank Replacement
4. Install Pick Up Tube & Gauge Sending Unit in new Tank. (If Required, See Assembly Drawings
sent with unit) The Pickup gauge sending unit from the factory tank will be installed into the new tank.
This is recommended to be done before mounting the new tank to the tractor (See Figure 13). The new
tank will have a fuel capacity of 51 gallons.