


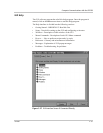


Starting the Commissioning Test File
152607 3–5
7. Once you finish checking the Front Panel Display, go back to the GUI
Commissioning procedure and click on the check box to indicate the task is
complete. Go to the next step by clicking on the "N
EXT" button.
Establish Communications with the GUI
1. Verify that the appropriate hardware has been installed for the desired
communications connection–Remote or Direct Connect.
If not, refer to the “PC Connection Methods” section of the PV225S 225 kW
Grid-tied Photovoltaic Inverter Planning and Installation Manual for
instructions.
2. Verify that the communications with the inverter is working and that you have
established a connection with the inverter through the GUI.
a) Verify the signal lights on the data communication devices show activity.
Once communications are established, close the connection.
b) While at the Inverter, create a fault. This could be done by opening the
DC Disconnect Switch (S2).
c) Verify the Inverter calls the End User and reports the fault. The fault
reporting from the inverter to the End User will take approximately 1
minute.
d) Repair the fault–close the DC Disconnect Switch (S2)–and have the End
User clear the alarm.
If communications is not working as expected, refer to the “General
Troubleshooting” on page 4–2 for help.
3. Once you verify that communication has been established and is working
properly, go back to the GUI Commissioning Procedure and click on the
check box to indicate the task is complete. Go to the next step by clicking on
the "N
EXT" button.
Confirm AC Operational Parameters
1. Verify the inverter’s AC limits.
2. Make any necessary changes.
3. Record these values.
4. Once you finish these tasks, go back to the GUI Commissioning Procedure
and click on the check box to indicate the task is complete. Go to the next step
by clicking on the "N
EXT" button.