


Maintenance Safety
152607 5–3
Lockout and Tag
Safety requirements mandate that this equipment not be serviced while energized.
Power sources for the PV225S must be locked-out and tagged prior to servicing.
Each energy source should have a padlock and tag installed on each energy source
prior to servicing.
The PV225S can be energized from both the AC source and the DC source. To
ensure that the inverter is de-energized prior to servicing, lock out and tag the
PV225S using the following procedure.
1. Open, lockout, and tag the incoming power at the utility main circuit breaker.
2. Open, lockout, and tag the AC Disconnect Switch (S1) on AC interface
assembly. See Figure 1-8 on page 1–12 for the location of the AC Disconnect
Switch.
3. Open, lockout, and tag the DC Disconnect Switch (S2) on DC interface
assembly. See Figure 1-8 on page 1–12 for the location of the DC Disconnect
Switch.
4. Using a confirmed, accurate meter, verify all power to the inverter is de-
energized. A confirmed, accurate meter must be verified on a known voltage
before use. Ensure that all incoming energy sources are de-energized by
checking the following locations.
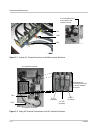
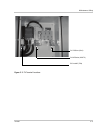
a) Inverter Terminals: TB5, TB6, and TB7 (Phase A, B, C)
See Figure 5-1 on page 5–4.
b) Utility Terminals: Top of S1-2T1, S1-4T2, and S1-6T3
See Figure 5-2 on page 5–4.
c) PV Terminals: Bottom of S2-6, K2-6T3, and TB4 (PV+, PV-, GND)
See Figure 5-3 on page 5–5.
WARNING: Shock Hazard
Review the system schematic for the installation to verify that all available energy sources
are de-energized. DC bus voltage may also be present. Be sure to wait the full 5 minutes to
allow the capacitors to discharge completely.