


Commissioning
3–2 152607
Commissioning Procedure
This section provides the procedure necessary to safely and correctly commission
a PV225S inverter.
Summary To commission the PV225S:
1. Ensure the Verification Tests have been completed and have passed
successfully. See the PV225S 225 kW Grid-tied Photovoltaic Inverter
Planning and Installation Manual, Section 4.
2. Begin the PV225S Commissioning Procedure as described in detail further in
this section. The steps are summarized below.
a) Start the GUI and open the PV225S Commissioning Procedure file.
b) Record the Serial Number.
c) Verify AC and DC Voltages.
d) Inspect Lower Inductor Enclosure.
e) Apply Grid Voltage.
f) Check the Front Panel Display.
g) Establish communications with the GUI.
h) Confirm Operational Parameters (AC, DC and Power Tracker).
i) Verify Door Interlock Functions.
j) Perform the Matrix Test.
k) Operate Inverter.
3. Submit the Test report and warranty form to Xantrex See “PRODUCT
REGISTRATION” on page WA–3.
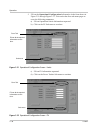
Starting the Commissioning Test File
1. Start the Xantrex Solar Graphical User Interface (GUI) program.
a) Once the application has started, select “G
ENERAL PROCEDURES” from the
“T
OOLS” pull-down menu.
b) In the “S
ELECT FILES” dialog box, choose “PV225S COMMISSIONING TEST”
and click the OPEN button.
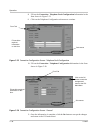
2. Verify that both the AC (S1) and DC (S2) Disconnect switches are open.
3. Verify the O
N/OFF switch (S3) is in the OFF position.
4. Once you finish these tasks, go back to the GUI and click on the check box to
indicate the task is complete. Go to the next step by clicking on the "N
EXT"
button.
Important:
It is important to record any issues encountered while following this
procedure.