


OPERATION
B-16 B-16
BULLDOG® 140
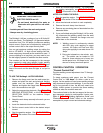
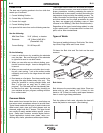
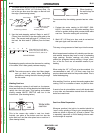
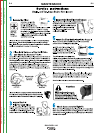
4. The bead should be put on with a weaving motion,
and it should be 1/2-3/4” (12.7-19.0mm) wide. Do
not let the arc blow over the edge, as that will dull
the edge. (See drawing below.)
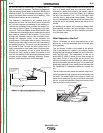
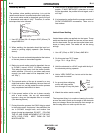
5. Use the back-stepping method. Begin to weld 3”
(76mm) from the heel of the share and weld to the
heel. The second weld will begin 6” (152mm) from
the heel, the third weld 9” (229mm) from the heel,
etc.
Backstepping greatly reduces the chances for cracking
of the share, and it also greatly reduces warping.
NOTE: The entire process is rather fast. Many begin-
ners go much too slowly when hardfacing
plowshares, running the risk of burning through
the thin metal.
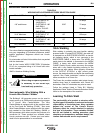
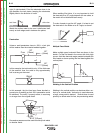
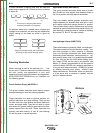
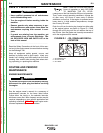
Welding Cast Iron
When welding on a piece of cold cast iron, the tremen-
dous heat from the arc will be absorbed and distributed
rapidly into the cold mass. This heating and sudden
cooling creates WHITE, BRITTLE cast iron in the
fusion zone. (See drawing below.)
This is the reason why welds in cast iron break.
Actually, one piece of the broken cast iron has the
entire weld on it and the other piece has no weld on it.
(See drawing below.)
To overcome this, the welding operator has two choic-
es:
1. Preheat the entire casting to 500-1200°F (260-
649°C) If the cast iron is hot before welding, there
will be no sudden chilling which creates brittle white
cast iron. The entire casting will cool slowly.
2. Weld 1/2” (12.7mm) at a time, and do not weld at
that spot again until the weld is cool.
This way, no large amount of heat is put into the mass.
Most inexperienced welders will probably use the sec-
ond method, because they have no way of preheating
large castings. Smaller castings can easily (and
should) be preheated before welding. A forge, stove,
fire, or the Arc Torch are all excellent means of pre-
heating.
When using the 1/2” (12.7mm) at a time method, it is
recommended to start 1/2” (12.7mm) away from the
previous bead and weld into the previous bead. This is
called backstepping.
After welding Cast Iron, protect the casting against fast
cooling. Put it in a container of warm, dry sand or lime.
If sand or lime is not available, cover it with sheet metal
or any other non-flammable material that will diminish
drafts and retain heat.
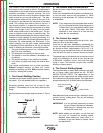
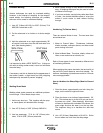
Cast Iron Plate Preparation
Wherever practical, the joint to be welded should be
“veed” out by grinding or filing to give complete pene-
tration as shown in figures (a), (b) and (c) below. This
is especially important on thick castings where maxi-
mum strength is required.
Work Table
Strike Arc
Here
Sharp Edge
Weaving Motion
Plow Share
Positioning of Share
Brick
1/2-3/4" width
(12-20mm)
hot
cold
cold
White brittle
cast iron
When breaking
the weld stays on
one piece
First weld from A to B; then
from C to A; then from D to C;
then from E to D; and so on.
BACKSTEPPING
(75mm)
3"
B
A
C
DE
Return to Section TOC Return to Section TOC Return to Section TOC Return to Section TOC
Return to Master TOC Return to Master TOC Return to Master TOC Return to Master TOC