


TP-5695 12/933-10 Scheduled Maintenance
Problem Means of Identification Possible Cause
Normal Light tan or gray deposit on the
firing tip.
Good operating conditions and
maintenance.
Gap bridged Deposits built-up and closing gap
between electrodes.
Oil or carbon fouling. Clean and
regap.
Oil fouled Wet black deposits on the insulator
shell bore electrode.
Excessive oil entering combustion
chamber through worn rings and
pistons, excessive clearance
between valve guides and stems,
or worn or loose bearings.
Replace plug.
Carbon fouled Black, dry fluffy carbon deposits
on insulator tips, exposed shell
surfaces, and electrodes.
Using too cold range plug, weak
ignition, clogged air intake or
improper carburetor adjustments,
defective fuel pump, overrich fuel
mixture, or excessive no load
operation. Clean and regap.
Lead fouled Dark gray, black, yellow, or tan
deposits; or a glazed coating on
the insulator tip.
Caused by highly leaded fuel.
Replace plug.
Pre-ignition Melted electrodes and possibly
blistered insulator. Metallic deposits
on insulator suggests internal
engine damage.
Wrong type of fuel, incorrect timing
or advance, too hot of a plug, burnt
valves, or engine overheating.
Replace and plug.
Overheating White or light gray insulator with
small black or gray/brown spots
with bluish (burnt) appearance on
electrodes.
Engine overheating, wrong type of
fuel, loose spark plugs, too hot a
plug, low fuel pump pressure or
incorrect ignition timing. Replace
plug.
Worn Severely eroded or worn
electrodes.
Caused by normal wear and failure
to replace at proper interval.
Replace plug.
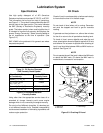
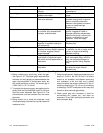
Figure 3-11. Spark Plug Condition
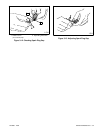
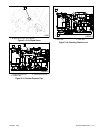
4. Before installing any spark plug, check the gap.
See Figure 3-12. The proper gap is attained when
the feeler (or wire) gauge just passes between the
spark plug electrodes. It should pass easily, but
with some resistance or drag. The correct gap is
0.028--0.031 in. (0.7--0.8 mm).
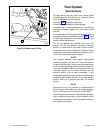
5. To readjust the spark plug gap, use gapping tool to
gently bend the side electrode closer to or further
from the center electrode. See Figure 3-13. The
side electrode must be centered over the center
electrode.
6. Being careful not to bump the electrode, hand
thread spark plug clockwise into cylinder head until
resistance is felt.
7. Using a torque wrench, tighten each spark plug to a
torque of 18--22 ft. lbs. (20--30 Nm). If a torque
wrench is not available, hand-tighten spark plug
until resistance is felt and then use a ratchet
wrench to tighten the plug an additional 1/2 turn (if
installing a new plug) or 1/8--1/4 turn (if reinstalling
a used plug). Do NOT overtighten as this may strip
threads or alter electrode gap setting.
8. Check spark plug wire connector in boot for
accumulated dirt, grease, etc., and clean as
necessary. Firmly push spark plug connector and
boot onto spark plug.