


3-3
Calibration
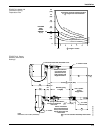
6. Determine the RTD resistance at the desired base and full scale
temperatures. For Calibration Code 1 (see Table 5-3, on page 5-9), these
resistances are listed in Table B-1.
7. Turn the power on.
8. Set the decade box to the resistance corresponding to the desired base
temperature. Adjust the zero potentiometer until the output is 4 mA.
Remember that recovery time of the unit from an underscale condition is
longer than from an over-scale condition. Therefore, set the box to a higher
resistance than that desired, then bring it down to the correct value.
9. Set the decade box to the resistance corresponding to the desired full scale
temperature. Adjust the span potentiometer until the output is 20 mA.
10. Repeat steps 8 and 9 until you obtain the 4 and 20 mA readings without
readjusting the span and zero potentiometers. Complete this process more
quickly by noting the full scale reading before readjusting the span pot,
using the span pot to overshoot the desired reading by 20%, and then
using the zero pot to readjust the full scale reading to 20 mA.
EXAMPLE:
To calibrate the Model 444RL1U1 for a range of 100 to 150 °F (38 to 66 °C),
first consult Table 3-1, and plug the jumper into pins Z2. From Table B-1,
trim points are 114.68 and 125.37 ohms corresponding to 100 °F and 150 °F
respectively. After adjusting the base to 4 mA, and setting the decade to full
scale resistance, output equals 22.5 mA, or 2.5 mA greater than desired. Set
the span pot to an output lower than 20 mA by the amount equal to 20% of
2.5 equals 0.5 mA, or 19.5 mA. Reset the zero pot so the output equals 20 mA.
Repeat steps 8 and 9 and this procedure until readjustments are no longer
necessary.
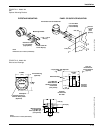
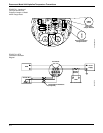
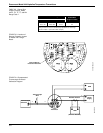
11. Disconnect the decade box and the readout resistor. Reconnect the RTD
and power leads. Replace the terminal cover.
12. Mark the correct range in the “Calibration” space on the nameplate
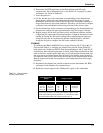
TABLE 3-1. Coarse Jumper
Location, Model 444R.
.
Base Temperature
Region
Jumper Location
°C °F 444RL1 444RL2 444RL3
–50 to 0
0to50
50 to 100
100 to 150
–58 to 32
32 to 122
122to212
212to302
Z1
Z2
Z3
Z4
Z1
Z1
Z2
Z2
Continuously
adjustable
(no jumper)
NOTE
If the base temperature is at a dividing point between regions, use the
lower jumper position optimum performance; i.e., use location Z1 rather
than Z2 for Model 444RL1 with a base temperature of 0 °C.