


33
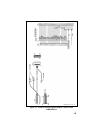
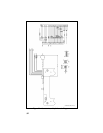
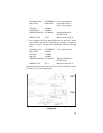
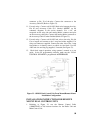
8. Connect the extended option accessory plug P4 to the following
options (if used, see Figure 29):
• Mobile Data Terminal
• Public Address (External Amplifier)
• External Microphone
• External Tone Encoder
• External Tone Decoder
• Output (User Defined)
• Input (User Defined)
CAUTION
Refer to accessory manual supplement for details regarding the
extended options listed above. DO NOT CONNECT DIRECTLY TO
A PC OR DATA TERMINAL. DAMAGE COULD RESULT!!!
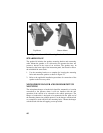
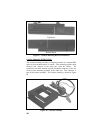
9. With the handle assembly in the UNLOCKED position (out in front
of the control unit), insert the radio into the cassette assembly.
Slide the radio into the cassette assembly until the back of the radio
meets the back of the cassette assembly.
NOTE
Caution should be used while engaging the radio in the cassette the
first few times until the cabling in the cassette mount assembly has had
an opportunity to work into its permanent location. To insure proper
first time engagement, the following procedure should be used:
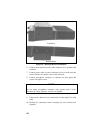
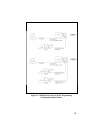
Insert radio into cassette mount opening and slide in until you feel
some spring resistance. Holding the handle, jiggle the radio a bit to
give it a chance to find the connectors. Then engage the radio handle
in the sheet metal hooks which protrude from the lower corners of the
cassette mount casing. Rotate the handle upward to fully engage the
radio. See Figure 30. DO NOT FORCE THE CONNECTOR
ENGAGEMENT portion of the travel.
If the radio does not go in using this procedure, a large flat blade
screwdriver may be used to re-position the 37 pin connector slightly to
assist the first time engagement.