


OUTLET MANAGED PDU
162
14.1. Creating a Self Signed Certificate
To create a Self Signed certicate, access the Text interface via Telnet or SSH, using
a password that permits access to Administrator level commands and then proceed as
follows:
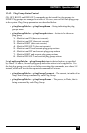
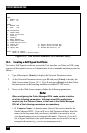
1. Type /N and press [Enter] to display the Network Parameters menu.
2. At the Network Parameters menu, type 23 and press [Enter] to display the
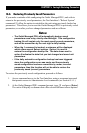
Web Access menu (Figure 14-1.) Type 3 and press [Enter] and then follow
the instructions in the resulting submenu to enable HTTPS access.
3. Next, use the Web Access menu to dene the following parameters.
Note:
When configuring the Outlet Managed PDU, make certain to define
all of the following parameters. Although most SSL applications
require only the Common Name, in the case of the Outlet Managed
PDU all of the following parameters are mandatory.
• 5. Common Name: A domain name, that will be used to identify the
Outlet Managed PDU. If you will use a Self Signed certicate, then this
name can be any name that you choose, and there is no need to set up
your domain name server to recognize this name. However, if you will
use a Signed certicate, then your domain name server must be set up to
recognize this name (e.g., service.yourcompany.com.)
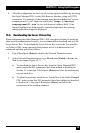
WEB ACCESS:
HTTP:
1. Enable: On
2. Port: 80
HTTPS:
3. Enable: Off
4. Port: 443
SSL Certicates:
5. Common Name:
6. State or Province:
7. Locality:
8. Country:
9. Email Address:
10. Organization Name:
11. Organizational Unit:
12. Create CSR: 15. Export Server Private Key:
13. View CSR: 16. Import Server Private Key:
14. Import CRT: 17. Harden Web Security: On
Enter: #<CR> to change,
<ESC> to return to previous menu ...
Figure 14-1: Web Access Parameters (Text Interface Only)