


OUTLET MANAGED PDU
134
8.7. The Power Range Status Screen
The Power Range Status Screen can be used to display power consumption readings
over a user-selected period of time, for the Outlet Managed PDU.
To view the Power Range Status Screen, access the Outlet Managed PDU command
mode using an account that permits access to Administrator or SuperUser level
commands and then proceed as follows:
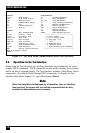
Text Interface:
1. Type /L and press [Enter] to access the "Display Logs" menu. From the
Display Logs menu, type 4 and press [Enter] to display the Power Metering
Log menu.
2. Power Metering Log Menu: The "Display Data Option" determines
whether the Outlet Managed PDU will display total current consumption for
each branch (Unit) or current consumption for each outlet (Plug). The Power
Metering Log Menu also allows you to either display Power Metering Data
or download Power History Data.
a) Display Power Metering: Type 2 and press [Enter]. The Outlet
Managed PDU will display the Power Metering menu, which allows you
to set a date range for the desired data and display the data selected.
b) Download Power History: See Section 8.8.
Web Browser Interface:
1. Place the cursor over the "Power Metering" link on the left hand side of the
screen. When the y-out menu appears, click on the "Power Range" link and
then select the desired Plugs or Plug Groups from the resulting menu.
2. Select the desired plugs, then click the "Select Plugs" button to display the
"List Power Range" menu.
3. Use the List Power Range menu to select the desired date range, and then
click on the "Get Chart" button.