


EURO • Printed in England • GB • F016 L69 838 • CLUB/ROYALE • OSW 08/01
English - 4
Parking brake
The parking brake is primarily used to assist stopping
on slopes and for parking. Do not attempt to apply
the brake with the drive engaged, drive control lever
raised. Only use the brake as required and not as a
general stopping device. This will prevent premature
wear on the roller rubber.
Use the brake as follows:
Releasing
Pull the brake lever 23 back and away from the
parking position “(P)” notch and allow the lever
to go forward to the brake off position “O”.
Braking
Pull the brake lever 23 back to the brake position
or if parking position “(P)” notch.
Engaging Cylinder cutter and rear roller
1. Ensure that the cutter release lever 24 is located in
notch.
2. Start engine and release the parking brake.
3. Push the red safety latch
25 forward and gradually
squeeze the drive lever 2 toward the top handle.
4. Release the red safety latch 25.
5. Adjust the speed as required by moving the throt-
tle lever 19 between and .
6. To stop, release the drive lever 2.
Engaging rear roller only
Note: To prevent damage to the transmission, ensure
the mower is stationary.
Lift and pull out the cutter release lever 24 from
notch.
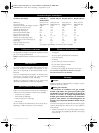
Before mowing, check the engine oil level and fill the
petrol tank.
Toward the end of season, it is advisable to put
only as much fuel in the tank as you need for
each cut, since it should be completely used be-
fore storing the mower.
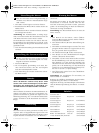
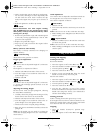
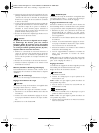
For best results, place the lawnmower on the
edge of lawn, mow in a forward direction figure.
Then at right angles at the end of each turn,
slightly overlapping the previously cut strip.
The next time you mow the lawn, try to work at right
angles to the previous cut as this will help prevent un-
evenness in the surface soil which can build up if you
always mow in the same direction.
Stop and remove spark plug cap.
Note: To ensure long and reliable service, carry out
the following maintenance regularly.
Regularly check for obvious defects such as loose,
dislodged or damaged blades, loose fixings, and
worn or damaged components.
Check that covers and guards are undamaged and
correctly fitted. Carry out necessary maintenance or
repairs before using.
Clean the exterior of the machine thoroughly using a
soft brush and cloth. Do not use water, solvents or
polishes. Remove all debris, especially from the air fil-
ter and engine fins.
If the mower should happen to fail despite the care
taken in manufacture and testing, repair should be
carried out by an authorised customer service agent
for ATCO garden products.
For all correspondence and spare parts orders, always
include the 10-digit part number from the nameplate
of the machine!
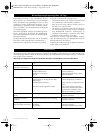
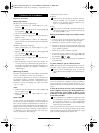
The cutter should be adjusted if the grass is not
cut cleanly and evenly.
1. Tilt the mower back and wedge securely.
2. Slacken adjuster bolt
26 and 27 on both sides of
mower.
3. Turn adjuster bolt 27 clockwise a little at a time.
Note: The blades are correctly adjusted when the cut-
ting cylinder lightly brushes the bottom blade across
the full width as the cylinder is turned.
The blade act like a pair of shears, as a test, correctly
adjusted blades will cut a piece of good quality writ-
ing paper across the width of the blade.
4. Once correctly adjusted tighten adjuster bolt 26.
To improve the throw of the grass into box adjust
the delivery plate as follow:
1. Slacken bolts 28.
2. Press the delivery plate down evenly, ensuring that
it does not touch the cylinder.
3. Once the ideal position is found tighten bolts 28.
Mowing
H
H
H K
K
J
Maintenance
Adjusting the Blade
Adjusting the Delivery Plate
G
G
CLUB/ROYALE - Buch Seite 4 Dienstag, 7. August 2001 2:41 14
16 • F016 L69 838 • TMS • 11.07.01