


12
Section 1: Assembly and Set-Up
RCR2596, RCR2510 and RCRM2510 Rotary Cutters 312-753M
5/09/08
Land Pride
Table of Contents
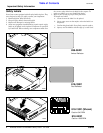
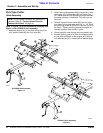
Pull-Type Cutter
Hitch Assembly
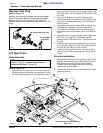
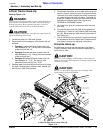
Refer to Figure 1-4 for RCR2596 hitch assembly and
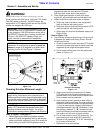
Figure 1-5 for RCR2510 hitch assembly:
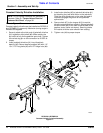
1. Assemble tongue (#1) to the deck using hitch pins
(#2), spacer tubes (#3) and linch pins (#4).
NOTE: Do not tighten hardware until assembly is
complete. Refer to “Torque Values Chart for
Common Bolt Sizes” on page 38.
22302
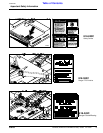
2. Attach level rod assemblies (#8) to tongue (#1) using
clevis pins (#5), flat washers (#6) and cotter pins
(#7). Make sure level rod adjusting nuts are threaded
the same distance on both rods. This will ensure a
level unit.
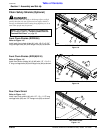
3. Remove hydraulic hose holder (#9) from the hitch
and install to the cutter deck with 3/4” x 1 1/2” GR5
hex head cap screw (#12) and 3/4” hex locknut (#13)
as shown. Tighten mounting bracket hardware as
needed to secure hose holder in place.
4. Route hydraulic hose through the hose holder loop.
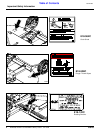
5. Remove parking jack (#10) from its storage position
on the deck and attach to the tongue (#1). Secure
with attached pin (#11). Adjust jack to desired height.
RCR2596 Hitch Assembly
Figure 1-4
22290
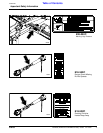
RCR2510 Hitch Assembly
Figure 1-5