


Section 4. ET106 Sensor Arm Installation
4-4
Input
Location
Parameter
Normal
Range
1 Battery (Volt) 9.6 to 14.0 Volts
2 Enclosure Temperature (°C) Close to air temperature
3 Air Temperature (°C) -40° to +50°
4 Air Temperature (°F) -40° to +122°
5 RH (%) 0 to 100%
6 Solar Radiation(kW m
-2
) 0 to 1.2 kW m
-2
7 Wind Speed (mph) 0 to 110 mph
8 Wind Direction (°) 0 to 359
9 Rain Fall (inches) 0 to .2
10 Soil Temperature 107 -40° to +122°F
28 Enclosure RH -40° to +50°C or 0% to 30% when
sealed for several hours
Display and set clock time using the *5 mode with the CR10KD (refer to the
laminated prompt sheet).
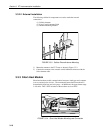
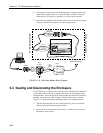
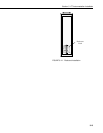
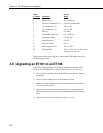
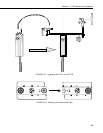
4.9 Upgrading an ET101 to an ET106
The ET101 can be upgraded to an ET106 by installing part number 10574
ET101 to ET106 Upgrade Kit as shown in Figure 4.9-1, 4.9-2, and 4.9-3.
1) Loosen the three leveling screws on the ET101 sensor bracket. Remove
the bracket.
2) Move the three leveling screws on the bracket as shown.
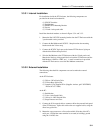
3) Remove the white temperature sensor from the bracket by removing the
three screws under its base.
4) Reverse the orientation of the bracket, and place it on the upgrade arm.
Thread the three leveling screws into the pre-threaded holes two to three
turns.
5) Install the sensor arm as described in Sections 4.1 to 4.7.