


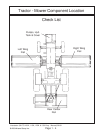

© 2004 Alamo Group Inc.
Page 2 - 3
Interstater (NH TS-100A , 115A , 125A & 135A Asy. Manual) 06/04
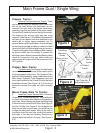
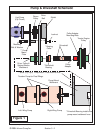
Main Frame Dual / Single Wing
Figure 4
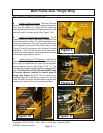
Frame Mount-
ing Rails LH
Side
Mainframe
Bolt to center of
rear tractor axle
using the six
holes in frame
and the threaded
holes in tractor
axle.
Figure 5
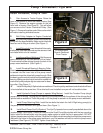
Mount Frame Rails To Tractor:
2. Install the Main Frame. The Mainframe bolts up
under the Tractor from the bottom. Bolt the Hyd Tube
Assembly to the mainframe before sliding it up under
the tractor (See Figure 2 & 3), make certain that the
hyd tube assembly is bolted in the right direction as
shown in Figure 2 as the tubes must be installed
correctly for the hydraulic lines to be installed correctly
later. Use floor jacks to support the mainframe under
tractor (See Figure 6)
3. Tightening Mainframe Bolts. With all the bolts
installed, the bolts at the front of the mainframe to the
frame mounting rails, the bolts through the rear of the
mainframe into the tractor. Tighten the bolts beginning
with the bolts that mount the frame rail mount to the
tractor in the front (See Figure 3 & 4). Second tighten
the four bolts that mount the frame rail to the frame rail
mounts (See Figure 3) . Next tighten the rear main-
frame bolts that connects the rear of the mainframe to
the tractor rear axle housing. Once all the bolts are
tightened you can remove any floor jacks from under
main frame.
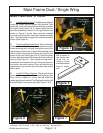
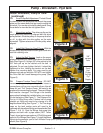
4. Install RH Wing Lift frame. The wing lift frame
pivots on two hinge pins. When installing these pins
they must be aligned in a way that will allow the
retaining bolt to be installed. The Right side and the Left
side will install in the same way (See Figure 7 & 8)
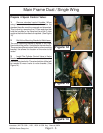
Figure 6
Floor Jack Supporting
Mainframe
Mainframe
under
tractor
Figure 7
Frame Hinge
Pins
RH
Side
Shown