


Front Panel Operation - 5
57
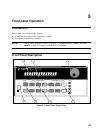
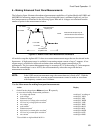
2 - Setting the Output Voltage, Current, Compensation, and Relay Mode
This example shows you how to set the output voltage and current. It also shows you how to set the
compensation circuit for either high or low capacitance cellular phones. Relay mode only applies to
Agilent models 66309B/D units that have Option 521 installed. Note that no front panel changes affect
the output of the unit unless it has been enabled.
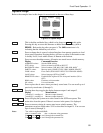
Set the output voltage
Action Display
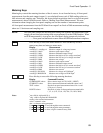
1. To enter an approximate value without using the voltage menu: On the Entry keypad,
press Æ or Ç to select the 1’s digit in the voltage field. Then rotate the front panel
RPG knob to obtain 7 V.
If the unit is in CC mode, you won’t see the output voltage change until the voltage
setting is low enough to cause the unit to go into CV mode.
7.003V 0.004A
2.
The easiest way to enter an accurate value: On the Function keypad, press Voltage.
On the Entry keypad, press Enter Number, 7, Enter.
VOLT 7.000
3.
To make minor changes to an existing value: On the Function keypad, press Voltage.
On the Entry keypad, press Æ or Ç to select the digit in the numeric field that you
wish to change. For example, move the flashing digit to the ones column to change a
value in this column. Then, press È to scroll from 7.000 to 8.000. Then press Enter.
VOLT 8.000
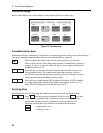
Set the output current limit
Action Display
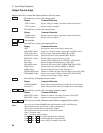
1. To enter an approximate value without using the current menu: On the Entry keypad,
press Æ or Ç to select the tenths digit in the current field. Rotate the front panel
RPG knob to obtain 0.4A.
If the unit is in CV mode, you will not see the output current change until the current
setting is low enough to cause the unit to go into CC mode.
8.003V 0.400A
2.
The easiest way to enter an accurate value: On the Function keypad, press Current.
On the Entry keypad, press Enter Number, .4, Enter.
CURR 0.400
3.
To make minor changes to an existing value: On the Function keypad, press Current.
On the Entry keypad, press Æ or Ç to select the digit in the numeric field that you
wish to change. For example, move the flashing digit to the tenths column to change a
value in this column. Then, press È to scroll from 0.400 to 0.500. Then press Enter.
CURR 0.500
NOTE: To output currents pulses greater than 3 A and up to 5 A peak, you must set the output
current limit to greater than 3 amperes (3.0712 amperes max).
Set the output compensation
Action Display
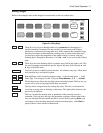
1.
On the Function keypad, press Output. Then press q until you obtain the
TYPE:CAP command. Use the É key and select either LOW, HIGH, or H2. Then
press Enter. Use
HIGH compensation for faster transient response when testing
phones with input capacitances greater than 5 µF, which applies for most phones. In
High mode, operation of the dc source may be momentarily unstable when testing
phones that have input capacitances under 5 µF. Use LOW compensation if this
occurs.
If the dc source senses that there is no load on the output, it will automatically
switch from High compensation mode to Low compensation mode.
H2 is an additional compensation mode that guarantees that the dc source stays in
High compensation mode at all times.
TYPE:CAP HIGH