22
11
Adjustments
All Models
Making Adjustments
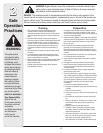
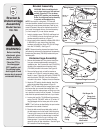
WARNING: Never attempt to make any
adjustments while the engine is running,
except where specified in the Operator’s
Manual. Place tractor on a firm and level
surface. Place the PTO in the disen-
gaged (OFF) position, set the parking
brake, shut engine off, and remove key
to prevent unintended starting.
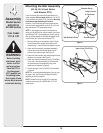
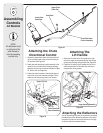
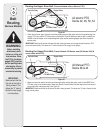
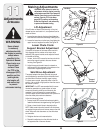
Lift Adjustment
If the lift index rod doesn’t latch securely or the pivot
release has too much slack in it, an adjustment can be
made as follows:
1. Loosen the upper hex nut a few turns, then tighten the
lower hex nut to shorten the cable length. See Figure 33.
2. Loosen the lower hex nut a few turns, then tighten the
upper hex nut to lengthen the cable. See Figure 33.
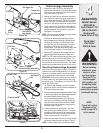
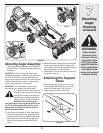
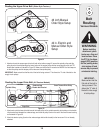
Lower Chute Crank
Support Bracket Adjustment
If the spiral at the base of the lower chute crank isn’t
fully engaging with the notches in the lower chute
assembly, the support bracket can be adjusted inward
or outward as follows:
1. Loosen, but do NOT remove the two hex nuts which
secure the support bracket to the snow thrower
housing. See Figure 34.
2. Adjust the support bracket inward or outward so
that the spiral is fully engaged in the notches on the
chute before retightening the hex nuts.
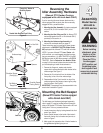
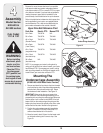
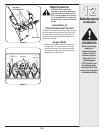
Skid Shoe Adjustment
The space between the shave plate and the ground
can be adjusted by repositioning the skid shoes found
on either side of the snow thrower’s auger housing.
For close snow removal, place skid shoes in the low
position. Use a middle or high position when the area to
be cleared is uneven.
IMPORTANT: It is NOT recommended that this snow
thrower be operated on a gravel surface, as loose
stones can be easily picked up and thrown by the
machine. If you must operate on a gravel surface,
ALWAYS adjust the skid shoes into the HIGH position to
allow the shave plate maximum clearance.
Adjust skid shoes as follows:
1. Loosen, but do NOT remove, the three hex nuts which
fasten the skid shoe to the auger housing. See Figure 35.
2. Raise or lower the skid shoe to desired position.
NOTE: Make certain the entire base of both skid shoes
are against the ground to avoid uneven wear on the skid
shoes. When one side does wear out, the skid shoes
are reversible.
3. Retighten the hex nuts loosened earlier.
4. Repeat this adjustment on the skid shoe found on
the opposite side of the snow thrower.
Figure 33
Figure 34
Figure 35
Never attempt
to make any
adjustments while
the engine is running,
except where
specified in the
Operator’s Manual.
Place tractor on a
firm and level
surface. Place
the PTO in the
disengaged (OFF)
position, set the
parking brake,
shut engine off,
and remove key
to prevent
unintended starting.
WARNING
Skid Shoe
Hex Nut
Spiral
Hex Nuts
Support
Bracket
Hex Nuts
Lift Index Rod
Lift Cable