


30 Service & Maintenance
MAN0943 (07/12/2011)
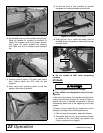
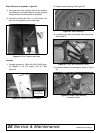
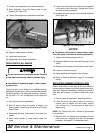
7. Loosen mounting bolts on one wheel assembly.
8. Slide assembly along the frame tube to new
position (see Figure 32).
9. Tighten mounting bolts to specified torque level.
Figure 32. Positioning Wheel Assembly
10. Remove safety stands or blocks.
11. Lower and remove jack.
12. Repeat with other wheel assemblies.
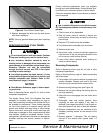
REPLACING FLAIL KNIVES
Do not handle knives with bare hands. Careless
or improper handling may result in serious injury.
■ Read Balance Statement, page 5, before replac-
ing any knives.
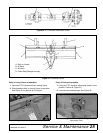
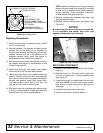
The flail knives in pairs swing on a hardened bushing,
designed to reduce wear, and are sandwiched between
two steel spacers. The hardened bushing is bolted to
the clip with a 1/2" NC carriage bolt and a flange lock
nut.
1. Clear the area of any bystanders.
2. Shut off tractor, place all controls in neutral, set
parking brake, remove key, and wait for all moving
parts to stop.
3. Disconnect driveline and hydraulic lines from the
tractor.
4. Place safety stands or large blocks under the
frame.
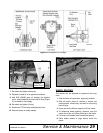
5. Loosen and remove the worn knife and its opposite
on the other side of the rotor. Discard worn knives
and their mounting hardware.
6. Replace with new knives and mounting hardware
(see Figure 33).
Figure 33. Flail Replacement
NOTICE
■ To maintain rotor balance, always replace oppo-
site (180°) pairs of knives and mounting hardware.
7. Tighten flail mounting flange lock nut.
8. Replace additional worn flails following step 5 and
step 6.
9. Remove safety stands or blocks from under frame.
10. Lower unit and remove jack.
11. Attach driveline and hydraulic line to tractor.
12. Refer to Balance Statement, page 5, for balance
issues.
REPLACING RUBBER SHIELD FLAPS
Rubber shield flaps on the front of the unit deflect or
prevent stones or debris from being ejected when oper-
ating unit. Replace if damaged or missing to provide a
safe work environment. To replace, follow this proce-
dure:
1. Clear the area of bystanders, especially children.
2. Lower the unit to the ground, place all controls in
neutral, shut off engine, set park brake, remove
key, and wait for all moving parts to stop before
dismounting.
NOTE: For 3-point hitch units, unhook to gain access
to center flaps.
3. Remove 3/8" nut, washer and carriage bolt from
each worn flap. (Replace any worn or damaged
hardware. See page 51 for hardware sizes.)
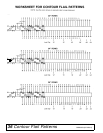
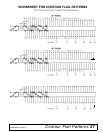
DP116
DP13