


18 Operation
MAN0943 (07/12/2011)
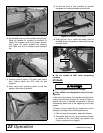
Without Quick Hitch Attachment:
10. Back tractor lower 3-point arms between lower
mast plates and align with lower 3-point hole.
11. Place 1-3/4 OD spacer through 3-point arm pivot
(both sides).
12. Push tractor’s 3-point arm to the inside and slide a
1-7/16 OD spacer between to take up the empty
space. Secure with lower 3-point hitch pin
assembly, 1-3/4 OD spacer, and 7/16 x 2 klik pin.
13. Repeat steps 5 and 6 for other side.
14. Lower the tractor’s top link arm and secure in top
hole of upper mast assembly using spacer, hex
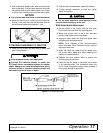
bolt, and lock nut. Attach PTO Driveline
1. Make sure the driveline telescopes easily and
shields rotate freely.
2. Attach the driveline to the tractor by retracting the
locking collar. Slide the yoke over the shaft and
push on the yoke until the lock collar clicks into
position. Make sure the yoke is locked into
position.
Attach Hydraulics and Lift Cylinder Hose
(Center Cutter Option)
1. Use a clean cloth to clean hose ends and area
around the couplers on the tractor.
2. Insert the hose male ends into the tractor couplers.
Make sure hoses lock in place.
3. Route hoses along or over the hitch and secure in
position with clips, tape, or plastic ties. Provide
enough slack for turning and lifting.
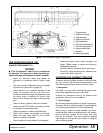
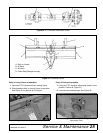
REMOVING SHREDDER FROM TRACTOR
Reverse the above procedure when removing unit from
the tractor. Engage transport lock channel at the four
struts prior to lowering shredder. Release pressure
before removing hoses.
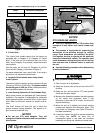
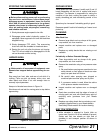
Figure 6. Transport Lock
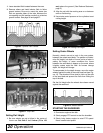
FIELD OPERATION
The Woods Flail Shredder is designed with the flexibil-
ity to operate well in almost any kind of crop and terrain
conditions. However, the operator is responsible for
being familiar with all operating and safety procedures
and following them. Each operator should review this
Field Operation section at the start of the season and
as often as required to be familiar with the unit.
Operators should also review the PRE-OPERATION
CHECK LIST, page 15, and Attaching Shredder to
Tractor, page 17.
Safety instructions are important! Read all
attachment and power unit manuals; follow all
safety rules and safety decal information. (Replace-
ment manuals and safety decals are available from
your dealer. To locate your nearest dealer, check
the Dealer Locator at www.WoodsEquipment.com,
or in the United States and Canada call 1-800-319-
6637.) Failure to follow instructions or safety rules
can result in serious injury or death.
Never allow children or untrained persons to
operate equipment.
Make sure shields and guards are properly
installed and in good condition. Replace if damaged.
Keep hands, feet, hair, and clothing away from
equipment while engine is running. Stay clear of all
moving parts.
Before dismounting power unit or performing
any service or maintenance, follow these steps:
disengage power to equipment, lower the 3-point
hitch and all raised components to the ground,
operate valve levers to release any hydraulic pres-
sure, set parking brake, stop engine, remove key,
and unfasten seat belt.
Never allow riders on power unit or attachment.
Do not allow bystanders in the area when oper-
ating, attaching, removing, assembling, or servic-
ing equipment.
Inspect and clear area of stones, branches, or
other hard objects that might be thrown, causing
injury or damage.
Operators must be instructed in and be capable
of the safe operation of the equipment, its attach-
ments, and all controls. Do not allow anyone to
operate this equipment without proper instructions.
Keep bystanders away from equipment.
Operate tractor PTO at the rpm speed stated in
“Specifications” section.
DP101