


30
Section 6: Maintenance & Lubrication
SBL2566, SBL2574, & SBL2584 with S/N 891531+ Snow Blowers 370-478M
3/18/15
Table of Contents
Outer Skid Shoe Replacement
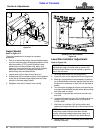
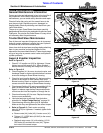
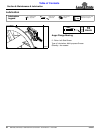
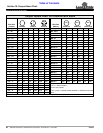
Figure 6-4
Outer Skid Shoe Option
Refer to Figure 6-4:
Inspect outer skid shoes for wear and replace as needed.
1. Park on a level solid surface, place skid steer/tractor
in park or neutral with park brake set, lower Snow
Blower until it is approximately 6" above ground,
disengage hydraulics, and wait for all components to
stop rotating before dismounting skid steer/tractor.
2. Place 1 1/2" to 3" thick support block(s) (#5) under
the grader blade (#1) near the right-hand and left-
hand skid shoes (#2).
3. Return to the skid steer/tractor and lower the Snow
Blower onto the support blocks (#5), shut engine off
and remove switch key. Wait for all components to
stop rotating before dismounting skid steer/tractor.
4. Count & record number of square holes “A” from top
down to the holes carriage bolts (#3) are located.
5. Remove hex nuts (#4), carriage bolts (#3), and right-
hand skid shoe (#2). Discard skid shoe and save
hardware for reattachment of new skid shoe.
6. Using the recorded number in step 4 above, insert
1/2"-13 x 1 1/4" GR5 carriage bolts (#3) through
square holes “A” in skid shoe (#2) and the Snow
Blower side panel. Secure carriage bolts with hex
flange lock nuts (#4).
7. Tighten lock nuts (#4) to the correct torque.
8. Repeat steps 4 to 7 above for left-hand skid shoe.
9. If skid shoes need readjusting, refer to “Outer Skid
Shoe Adjustment” on page 21.
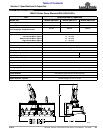
35607
Outer Skid Shoe Part Numbers
Part No. Part Description
370-436H OUTER RIGHT-HAND SKID SHOE SBL66
370-437H OUTER LEFT-HAND SKID SHOE SBL66
370-449H OUTER RIGHT-HAND SKID SHOE SBL74/84
370-450H OUTER LEFT-HAND SKID SHOE SBL74/84
Outer Skid Shoe Assembly
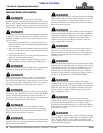
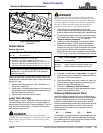
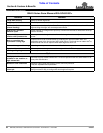
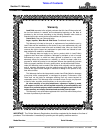
Figure 6-5
Inner Skid Shoe Option
Refer to Figure 6-5:
Inspect inner skid shoes for wear and replace as needed.
1. Park on a level solid surface, place skid steer/tractor
in park, and lower both ends of grader blade onto
support blocks or jack stands that are, at a minimum,
8 1/2" high.
2. Shut skid steer/tractor engine off and remove switch
key.
3. On the left-hand side, remove hairpin cotter (#2),
bent pin (#3), and inner skid shoe (#1).
4. Reinsert new inner skid shoe (#1).
5. Insert bent pin (#3) thru the same holes in the skid
shoe mount and new skid shoe that it was removed
from.
6. Secure bent pin with hairpin cotter (#2).
7. Repeat steps 3 & 4 for the right-hand side.
8. If skid shoes need readjusting, refer to “Inner Skid
Shoe Adjustment” on page 21.
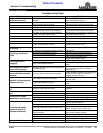
37224
Inner Skid Shoe Part Numbers
Part No. Part Description
370-439H INNER SKID SHOE