


29
Section 6: Maintenance & Lubrication
3/18/15
SBL2566, SBL2574, & SBL2584 with S/N 891531+ Snow Blowers 370-478M
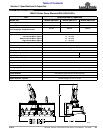
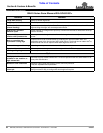
Table of Contents
Impeller Inspection
Figure 6-1
Auger & Impeller Inspection
Figure 6-2
Motor Mount Inspection
Figure 6-3
35614
35608
35812
Section 6: Maintenance & Lubrication
General Maintenance Information
Proper servicing and adjustment is key to the long life of
any implement. With careful inspection and routine
maintenance, you can avoid costly downtime and repair.
Check all bolts after using unit for several hours to be
sure they are tight. Replace any worn, damaged, or
illegible safety labels by obtaining new labels from your
Land Pride dealer.
The parts on your Snow Blower have been specially
designed and should only be replaced with genuine Land
Pride parts. Do not alter the Snow Blower in a way which
will adversely affect its performance.
Tractor/Skid Steer Maintenance
One of the most important things you can do to prevent
hydraulic system problems is ensure that your hydraulic
oil remains free of dirt and contamination.
Use a clean cloth to wipe hose couplings before attaching
them to your machine and replace hydraulic filter
elements at the prescribed intervals. These simple steps
will go a long way to prevent control valve and hydraulic
cylinder problems.
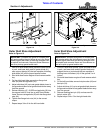
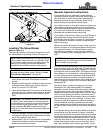
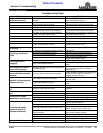
Auger & Impeller Inspection
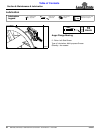
Refer to Figure 6-1:
1. Check 2"-12 impeller nut (#3) for tightness. If loose,
tighten jam nut with wrench (#1). When finished,
secure wrench to housing with flange lock nuts (#2).
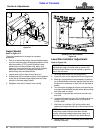
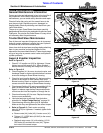
Refer to Figure 6-2:
2. Check impellers (#1) for wear, structural cracks, and
breakage. Repair or replace impeller before it causes
structural damage to Snow Blower housing.
3. Check for bent impeller blades (#1) that are making
contact or are about to make contact with Snow
Blower housing. Repair or replace impeller before it
causes structural damage to Snow Blower housing.
4. Check auger flighting (#3) and auger paddles (#2) for
wear, structural cracks, bending, and breakage.
Repair or replace auger before components break-
off and are sent into the impeller or through the air.
5. Check end bearing (#5) for wear. Replace bearings
that are worn excessively.
6. Lubricate bearings as required. See lubrication
schedule for “Auger Flange Bearing” on page 32.
7. Check bearing mounting bolts (#4) for tightness.
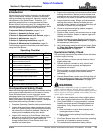
Make certain they are tightened to the correct torque.
8. Refer to Figure 6-3: Check motor mounting
bolts (#2 & #5) for tightness. If needed, tighten bolts
as follows:
a. Remove nuts (#4), bolts (#3), & motor cover (#1).
b. Tighten 1/2"-13 GR5 bolts (#2 & #5) to the correct
torque as needed.
c. Reattach motor cover (#1) with existing 1/4"-20
GR5 bolts (#3) and hex lock nuts (#4). Tighten
lock nuts to the correct torque.