


13
Section 2: Equipment Hook-up & Unhook
3/18/15
SBL2566, SBL2574, & SBL2584 with S/N 891531+ Snow Blowers 370-478M
Table of Contents
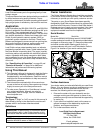
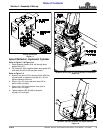
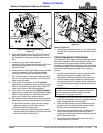
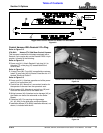
Quick Disconnect Coupling Set-up
Figure 2-3
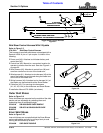
4. Route wire harness (#4) in Figure 2-3 & Figure 2-4
along side hydraulic hoses to solenoids (#1 & #2).
Do not secure wire harness (#4) with cable ties at this
time.
5. At solenoid (#1), attach brown banded
connector (#1B) to brown wire connector (#3B) and
white banded connector (#1W) to white wire
connector (#3W).
6. At solenoid (#2), attach red banded connector (#2R)
to red wire connector (#3R) and green banded
connector (#2G) to green wire connector (#3G).
7. Sit in the skid steer or tractor seat, fasten seat belt,
start unit, turn auxiliary hydraulics “on”, and position
loader arms fully down.
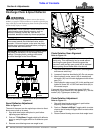
8. At the control box, push on the “Tilt Up/Down”
toggle switch to tilt deflector spout up and pull toggle
switch to tilt deflector spout down. Watch spout to
make sure it moves in the proper direction.
9. At the control box, push on the “Rotate Left/Right”
toggle switch to rotate chute to the left and pull toggle
switch to rotate chute to the right. Watch chute to
make sure it rotates in the proper direction.
10. Shut skid steer/tractor down and make any needed
adjustments to the solenoid connections as follows:
• If spout tilts opposite of what it should, change
green wire connector (#3G) with red wire
connector (#3R) at solenoid (#2).
• If chute rotates in the opposite of what it should,
change brown wire connector (#3B) with white wire
connector (#3W) at solenoid (#1).
35606
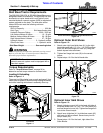
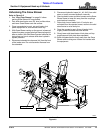
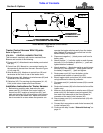
Hydraulic Hoses & Cable Ties
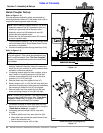
Figure 2-4
Refer to Figure 2-4:
11. Adjust path of hydraulic hoses (#1, #2, #3) and wire
harness (#4) to suit and secure with cable ties (#5) as
needed.
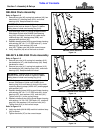
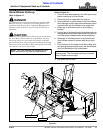
Check Equipment Clearances
It is important to check clearance before putting the Snow
Blower into operation. Make sure hydraulic hoses and
wiring harness are long enough and won’t become
pinched or entangled in the equipment. Also, make sure
Snow Blower does not come in contact with tractor frame
and tires by carefully going through its full range of
motions.
1. Visually inspect hydraulic hoses for possible pinch
points and shortness. If needed, make hose
adjustments before putting equipment into service.
2. Visually inspect wiring harness for possible pinch
points and shortness. If needed, make adjustments
to the wiring harness before putting equipment into
service.
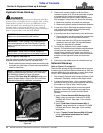
3. If necessary, have someone stand nearby that can
motion for the operator to stop if a problem develops
while completing steps 4 thru 6 below.
4. Start skid steer/tractor and raise loader arms high
enough to tilt hitch plate fully down without Snow
Blower making contact with the ground.
5. Fully extend and retract hydraulic cylinders on the
end of the skid steer/tractor loader arms while
watching for interferences between skid steer/tractor
and Snow Blower frame.
6. Raise skid steer/tractor loader arms fully up and
repeat steps 4 thru 5 above.
35599
1
2
3
5
4
IMPORTANT: Make sure hydraulic hoses and wiring
harness are long enough and properly secured so
that they do not become stretched or pinched
through their full range of motions.