


6
SECTION II. TRACTOR PREPARATION
This section contains instructions for preparing the
tractor for installation of the Front Hitch System.
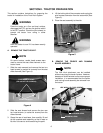
WARNING
Place the tractor on a firm and level surface,
disengage the PTO, and turn the ignition switch
to the OFF position. Chock the front wheels to
prevent the tractor from rolling in either
direction.
WARNING
Allow the tractor to cool if it has been recently
operated.
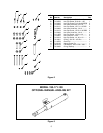
A. REMOVE THE TRACTOR SEAT.
NOTE
On some tractors, socket head screws were
used to secure the seat slide channels to the
tractor frame.
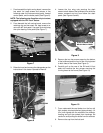
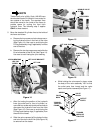
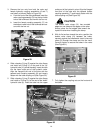
1. Slide the seat rearward and remove the two torx
head screws (or socket hd. screws) from the seat
slide channels (See Figure 4).
Figure 4
2. Slide the seat forward and remove the two rear
torx head screws ( or socket hd. screws) from the
slide channels.
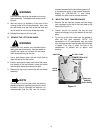
3. Grasp the rear of seat base, then carefully lift and
tip the complete seat assembly so that it rests on
its side. Use care to avoid scratching the paint.
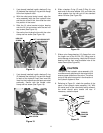
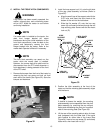
4. Lift the locking tab of the connector and unplug the
wire harness connector from the seat switch (See
Figure 5).
5. Place the seat assembly to the side.
Figure 5
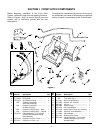
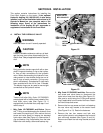
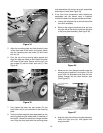
B. REMOVE THE FENDER AND RUNNING
BOARD ASSEMBLY
NOTE
The front hitch attachment can be installed
without removing the tractor fenders. However,
because of limited access and to ensure proper
installation, it is recommended that the fender
and running board assembly be removed from
the tractor.
Figure 6
SLIDE CHANNELS
TORX HEAD SCREWS
(OR SOCKET HD. SCREWS)
HARNESS
CONNECTOR
SEAT
SWITCH
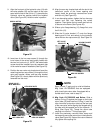
HEX WASH. HD. TAPP SCREWS
REVERSE PEDAL
FORWARD PEDAL
BRAKE PEDAL