


21
E. CHECK OPERATION.
If all previous installation procedures were correctly
performed, the front hitch should raise when the lift
handle is pulled upward (rearward) and lower when
pushed downward (forward). If the opposite actions
occur, switching the hose connections at the cylinder
will correct the problem. Proceed a follows:
CAUTION
Position a suitable container to catch any oil
leakage. Obey all applicable laws for disposal of
oil.
1. Lower the front hitch to its lowest position and stop
the tractor engine.
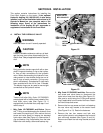
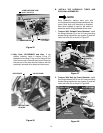
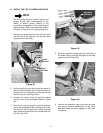
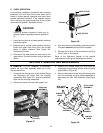
2. Because the oil may be under pressure, carefully
loosen the upper hose fitting from the cylinder
elbow to relieve pressure (See Figure 46).
Disconnect the hose.
3. Disconnect the lower hose and reconnect to the
upper elbow. Connect the other hose to the lower
elbow.
Figure 46
4. Start the tractor and completely cycle the hydraulic
lift system several times to prime the system.
5. Recheck the oil level in the transmission and fill to
the full mark on the dipstick.
Refer to the Operator’s Manual of the specific
attachment for hitching and operating instructions.
ELBOWS
HOSE FITTING
HOSE FITTING
SECTION V. REMOVAL AND MAINTENANCE
A. REMOVAL. It is not necessary to completely
remove the front hitch assembly when not in use.
Remove as follows:
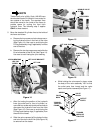
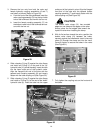
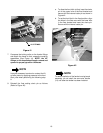
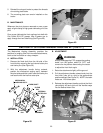
1. Compress the locking collar of the female fittings
and disconnect the hoses from the coupling
assemblies (See Figure 47). Snap the protective
caps onto the coupling assemblies.
2. Remove the hoses from the hose support rod.
Figure 47
3. Remove the internal cotter pin and clevis pin
fastening the top of the lift cylinder to the mounting
plate (Refer to Figure 39).
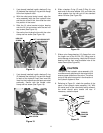
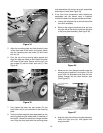
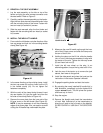
4. Remove the wingnut knobs; then pull the pivot pins
from the mounting and pivot plate assemblies to
disconnect the front hitch assembly (See Figure
48).
Figure 48
COUPLING
ASSEMBLY
LOCKING
COLLARS
WINGNUT
KNOB
PIVOT PIN
ASSEMBLY
MTG. PLATE
ASSEMBLY
PIVOT
PLATE
ASSEMBLY
WINGNUT
KNOB
HITCH YOKE
ASSEMBLY