


8
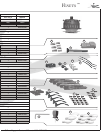
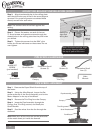
PIPE SCROLL ASSEMBLY
PIPE SCROLL HARDWARE
MOUNTING BRACKET INSTALLATION CONT.
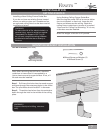
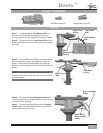
Step 3. Align the slotted holes in the ceiling plate
with the pilot holes you drilled in the wood support
structure. For proper alignment use slotted holes
directly across from each other.
Note: The isolators should be ush against the
ceiling.
Step 4. Place a at washer on each of the two
3” wood screws and pass the screws through the
slotted holes in the ceiling plate into the pilot holes
you drilled.
Step 5. Tighten the screws into the 9/64” pilot
holes; do not use lubricants on the screws. Do not
over tighten.
Joist
Ceiling Fan
Approved
Wiring Box
Washer
Wood
Screw
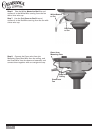
Allen
Wrench
ALLEN SET
SCREW
(pre-installed)
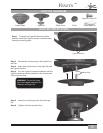
Scroll Bracket
Decorative Scroll
Screws (3)
Decorative Scroll
Arm (3)
Scroll
Screws (3)
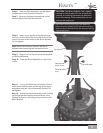
Note: On sloped ceilings, align
the canopy opening toward
the top or peak of the room.
Screwdriver
Canopy
Trim Ring
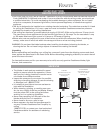
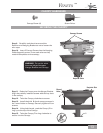
Step 1. Remove the Paper Shield from the top of
the motor.
Step 2. Using the Allen Wrench, loosen the Set
screw at the top of the Scroll Assembly, and on the
Motor Adapter on the top of the Motor.
Step 3. Remove the Trim Ring from the Canopy.
Step 4. Insert the Pipe Assembly through the
Canopy rst, Trim Ring second, and nally the
Scroll Bracket.
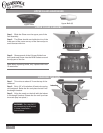
Step 5. Feed the wires from the fan through the
downrod.
Note: Make sure all the wires are on the same side
of the metal dowel pin inside the dowrod.
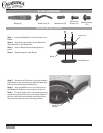
Canopy
Trim Ring
Scroll Bracket
Fan Wires
Pipe Assembly