


26
3. Remove the lint drawer, the control and lint door, and the gas valve train assembly from the dryer. Follow gas
valve train removal procedure in section C.
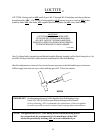
4. With the gas valve train assembly removed from the dryer, remove the two (2) sets of nuts securing the
manifold bracket to the gas valve train slide.
5. Pull manifold and valve assembly back slightly so that the burner orifice is exposed.
6. Unscrew burner orifice and replace with L.P. orifice.
IMPORTANT: Use extreme care when removing and replacing orifice. This orifice is made of brass and
is easily damaged.
NOTE: Consult factory when replacing orifice for elevations over 2,000 feet.
7. Reinstall the valve and manifold assembly by reversing steps 4 through 6.
8. Locate valve regulator adjustment cover. Remove cover with slotted screwdriver, install valve L.P. stem and
spring kit, then reinstall cover.
9. Reinstall the gas valve train assembly removed in step 3.
IMPORTANT: Use extreme care when removing and replacing the orifice. This orifice is made of brass
and is easily damaged.
10. Reinstall the control and lint door and the lint drawer removed in step 3.
11. Convert opposite basket by following steps 2 through 11.
12. Once the conversion of both baskets is complete,
open all gas shut-off closed in step 2.
IMPORTANT: The gas valve pressure regulations are now blocked open. Gas pressure must now be
regulated at the source (L.P. tank) or a regulator must be added in the gas supply line of
each dryer. A consistent pressure of 10.5 to 11 inches must be provided.
13. Reestablish power to the dryer.
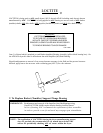
DD. To Replace Coin Vault
1. Discontinue power to the dryer.
2. Remove both (upper and lower) lint drawers and the control and lint doors from the dryer. Follow lint drawer, and
control and lint doors from the dryer. Follow lint and control and lint removal procedures in sections A and B.
3. Remove the control box and the lower front panel from the dryer. Follow front panel removal procedures in
section E.
4. Remove the coin box.
5. From inside of coin vault, loosen and remove the four (4) nuts securing the coin vault to the dryer inner top,
then the coin vault from the dryer.
6. Install the new coin vault by reversing step 5.
Do not tighten the four (4) nuts. They must be left lose at this
time for the coin vault adjustment.
7. Reinstall the front panel removed in step 3.
8. Tighten the four (4) coin vault HEX nuts left loosen in step 6.
9. Reinstall the coin box removed in step 4.
10. Reinstall the control box removed in step 3.
11. Reinstall control and lint doors, and lint drawers removed in step 2.