


15
NOTE: These connectors can be removed from the DMC controller (computer) by squeezing the side tabs
while pulling the connector outward.
5. Depending on the service function to be performed, the control panel assembly can be left on the control box
or removed entirely from the dryer. To remove the control panel, follow control panel removal procedure,
section 1, step 5.
6. Disconnect the touch pad (keypad) ribbon connector by holding on to blue ribbon connector and pulling
outward.
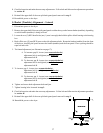
7. Remove the two (2) screws securing the dual microprocessor (DMC) computer to the metal control panel
and gently disassemble the dmc controller (computer) from the panel.
8. Install the new dual microprocessor control (DMC) computer by reversing the procedure in step 7.
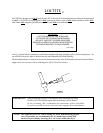
IMPORTANT: When installing the new dual microprocessor control (DMC), make sure that the trans-
former on the DMC controller (computer) is located at the bottom area of the control panel.
9. Reverse steps 1 through 6.
NOTE: When reconnecting the optic switch harness connector, for single coin acceptor models, connect
the harness to the lower of the two (2) connectors on the DMC controller (computer).
NOTE: For models with the dual coin option, the lower denomination harness connector (red, green
and orange wires) are connected to the lower connector on the DMC controller (computer), and
the higher denomination harness (black, green and orange wires) are connected to the higher connec-
tor on the DMC controller (computer).
O. To Replace Touchpad (Keypad)
1. Discontinue power to the dryer.
2. Remove the lint drawer and the control door from the dryer. Follow lint drawer, and control and lint door
removal procedures in sections A and B.
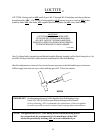
3. Remove screws located in the bottom right hand corner of the control panel.
4. Open the control panel and disconnect touchpad (keypad) ribbon connector from the DMC controller (com-
puter) by holding on to the blue ribbon connector and pulling outward.
5. Remove the "U" shaped coin reject and return holder located on the bottom of the touchpad (keypad) by
removing the two (2) HEX nuts (with a 1/4" nut driver) at the back side of the control panel securing the
"U"coin reject and return holder to the panel.
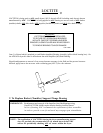
6. Peel the touchpad (keypad) off the panel. The ribbon cable and connector will come out through the slot in
the control panel.
7. To replace the touchpad (keypad), peel the paper backing off the new touchpad. Put the ribbon cable and
connector through the slot in the control panel. Holding the new touchpad close to the panel, align it into
position and gently press into place.
8. Replace the "U" shaped coin reject and return holder removed in step 5.
9. Reverse steps 1 through 4.
P. To Replace Coin Acceptor
1. Discontinue power to the dryer.
2. Remove the lint drawer and the control door from the dryer. Follow lint drawer, and control and lint door
removal procedures in sections A and B.