


16
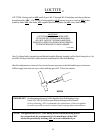
3. Remove screw located in the bottom right hand corner of the control panel.
4. Disconnect the optic switch connector from the jumper connector. This is done by squeezing the optic switch
connector tabs and pulling apart.
5. Remove the two (2) nuts holding the "U" shaped coin reject and return holder by using a 1/4" nut driver.
6. Remove the two (2) nuts located at the top of the coin acceptor with the same 1/4" nut driver. The coin
acceptor can now be removed.
7. Reverse procedure for installing the new coin acceptor.
8. Reestablish power to the dryer.
Q. To Replace either Motor Relay
1. Discontinue power to the dryer.
2. Remove the lint drawer, and the control door from the dryer. Follow lint drawer, and control and lint door
removal procedures in sections A and B.
3. Remove screw located in the bottom right hand corner of the control panel and open the panel.
4. Either relay can be removed with the control box in place on the dryer, or the control box can be removed
from the dryer and placed on a flat surface. To remove the control box follow control box removal procedure
in section D.
5. Disconnect the wires on the particular relay that needs to be replaced. Note the location of each wire on the
relay.
6. Remove the motor relay from the control box by removing the two (2) screws and nuts securing it to the
control box.
7. Replace new relay by reversing the steps above.
NOTE: Be sure to note the location of wires on the relay before removal.
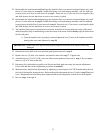
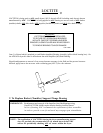
R. Basket (Tumbler) Alignment - Vertical
1. Discontinue power to the dryer.
2. Remove the upper half of the rear split back guard panel to either the top or the bottom basket (tumbler),
depending on which basket (tumbler) is being serviced.
3. Loosen the four (4) HEX head bolts in the sides of the bearing box (two [2] on each side).
4. Back off jam nuts on the two (2) Allen head adjustment screws.
5. Turn the screws clockwise evenly to raise the basket (tumbler) or counterclockwise evenly to the lower
basket (tumbler).
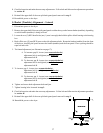
6. Rotate the basket (tumbler) from the front and check alignment with the main door opening.
IMPORTANT: Leave larger gap from the inside ring on the top of the front panel opening to the basket
(tumbler), and a smaller gap on the bottom to compensate for the weight of the clothes
being dried.
7. Tighten the four (4) HEX head bolts on the sides of the bearing box, and the two (2) jams (hex) nuts on the
Allen head adjustment screws.