


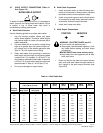

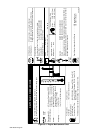


OM-166 941 Page 19
SECTION 7 − SEQUENCE OF OPERATION
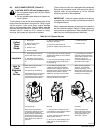
WARNING: ELECTRIC SHOCK can kill;
MOVING PARTS can cause serious injury;
IMPROPER AIR FLOW AND EXPOSURE TO
ENVIRONMENT can damage internal parts.
• Do not touch live electrical parts.
• Stop the engine and disconnect negative (−)
battery cable from battery before inspecting
or servicing.
• Keep away from moving parts such as fans,
belts, and rotors.
• Keep all covers and panels in place while op-
erating.
Warranty is void if the welding generator is oper-
ated with any portion of the outer enclosure re-
moved.
ARC RAYS can burn eyes and skin; NOISE
can damage hearing.
• Wear correct eye, ear, and body protection.
FUMES AND GASES can seriously harm
your health.
• Ventilate to keep from breathing fumes and
gases.
• If ventilation is inadequate, use approved
breathing device.
• Use in open, well ventilated areas or vent ex-
haust out of doors.
HOT METAL, SPATTER, SLAG, and EX-
HAUST can cause fire and burns.
• Watch for fire.
• Have a fire extinguisher nearby, and know
how to use it.
• Allow work and equipment to cool before han-
dling.
ENGINE FUEL can cause fire or explosion.
• Stop engine before checking or adding fuel.
• Do not spill fuel; if spilled, wipe up.
• Do not refuel if engine is hot or running.
• Do not refuel near sparks or open flame.
• Do not smoke while refueling.
• Do not fill tank to top; allow room for expan-
sion.
MAGNETIC FIELDS FROM HIGH CUR-
RENTS can affect pacemaker operation.
• Wearers should consult with their doctor be-
fore going near arc welding, gouging, or spot
welding operations.
See Section 1-Safety Rules For Operation Of
Arc Welding Power Source for basic welding
safety information.
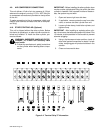
7-1. SHIELDED METAL ARC WELDING (SMAW)
WARNING: Read and follow safety informa-
tion at beginning of entire Sections 5 and 7
before proceeding.
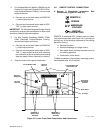
1. Install and connect unit according to Section 4.
2. Wear dry insulating gloves and clothing.
3. Connect work clamp to clean, bare metal at
workpiece.
4. Select proper electrode.
5. Set Ampere Ranges switch and rotate AMPER-
AGE & VOLTAGE ADJUSTMENT control to the
desired position (see Sections 6-1 and 6-2).
6. If remote amperage control is not used, place
AMPERAGE & VOLTAGE switch in the PANEL
position. If remote amperage control is to be
used, place AMPERAGE & VOLTAGE switch in
the REMOTE position.
7. If remote contactor control is not used, place
OUTPUT(CONTACTOR) switch in the ON posi-
tion. If remote contactor control is to be used,
place OUTPUT(CONTACTOR) switch in the RE-
MOTE position.
8. Start engine as instructed in Section 7-6.
9. Connect desired auxiliary equipment to the 120
volts ac terminals according to Section 5.
10. Place Engine Control switch in the RUN position.
11. Energize auxiliary equipment, if applicable.
12. Wear welding helmet with proper filter lens ac-
cording to ANSI Z49.1.
13. Insert electrode into electrode holder.
14. Begin welding.
7-2. GAS METAL ARC (GMAW) AND FLUX
CORED ARC WELDING (FCAW)
WARNING: Read and follow safety informa-
tion at beginning of entire Sections 5 and 7
before proceeding.
1. Install and connect unit according to Section 4.
2. Install and connect wire feeder to the terminal
strip according to wire feeder Owner’s Manual
and Section 4-8.
3. Wear dry insulating gloves and clothing.
4. Connect work clamp to clean, bare metal at
workpiece.
5. Set Ampere Ranges switch and rotate AMPER-
AGE & VOLTAGE ADJUSTMENT control to the
desired position (see Section 6-1 and 6-2).