


Using LO100 40
5.
Click the Apply button.
Configuring the virtual floppy from the BIOS setup
1. On the target server, press the F10 key during POST to enter BIOS setup.
2. In the BIOS Setup Utility, press the right arrow (→) key to navigate to the Advanced menu.
3. Press the down arrow (↓) key to scroll to IPMI. Press the Enter key.
4. Press the down arrow (↓) key to scroll to VSI configuration. Press the Enter key.
5. Select Virtual Floppy, and press the Enter key.
6. Select Enabled.
7. Press the down arrow (↓) key to scroll to TFTP Server IP Address, and enter the IP address of the TFTP
server that you configured in the "Configuring the TFTP server (on page 39)" section of this guide.
8. Press the down arrow (↓) key to scroll to Floppy Timeout to change the default value.
9. Press the down arrow (↓) key to scroll to Image Directory Name. Press the Enter key.
10. In the Enter new Address Path box, enter the path to the folder containing the floppy boot image.
This path is relative to where the TFTP server program, TFTP.exe, resides. For example, if TFTP.exe is
in C:\tftp and the floppy boot image in C:\tftp\rboot, then the path would be rboot.
11. Press the F10 key to save the changes and exit Setup.
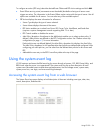
Configuring virtual floppy from the CLP
1. Open a CLP window on the remote system, and enter cd map1/nic1 at the command prompt.
2. Configure the TFTP server path by entering the following: set oemhp_vsi_tftpserver=<path>
where <path> is the remote TFTP server IP address. For example:
set oemhp_vsi_tftpserver=10.12.52.142
3. Configure the VSI path by entering the following: set oemhp_vsi_path=<path>, where <path> the
path to the folder containing the floppy boot image. This path is relative to where the TFTP server
program TFTP.exe resides. For example, if the TFTP server program TFTP.exe is in C:\tftp and the
floppy boot image in the folder c:\tftp\rboot, then the path would be rboot. For example: