


4
www.chpower.com
Operating Instructions and Parts Manual
Pre-Operation (Continued)
GROUNDING
1. Use the ground terminal and
wing nut on the generator frame
to connect the unit to a suitable
ground source. Securely fasten
the end terminal of the ground
wire to the ground terminal on
the generators frame. Tighten the
washer and wing nut on top of the
ground wire end terminal.
2. The ground wire should be made
of #8 gauge wire. Do not use wire
with a higher gauge number.
Higher gauge numbers indicate
thinner wire, which may not
provide an adequate ground path.
3. The other end of the ground wire
must be securely fastened to an
approved ground source.
The following are ground sources
approved by the National Electric
Code. Other ground sources may be
acceptable. Refer to the National
Electric Code and local regulations for
further ground source information. If
not sure of regulations or procedures,
obtain assistance from a qualified
(licensed or certified) electrical
technician.
a. An underground water pipe at
least ten feet in length
b. A non-corrosive underground
pipe at least eight feet in length
and 3/4 inch diameter
c. A steel or iron underground rod
at least eight feet in length and
5/8 inch diameter
d. A non-ferrous rod at least
eight feet in length, 1/2 inch
in diameter, and approved for
grounding purposes
Any rod or pipe used for grounding
must be driven to eight feet deep or
buried in the deepest possible trench.
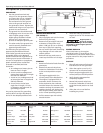
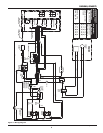
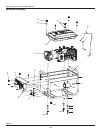
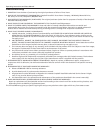
FUELING AND REFUELING
(SEE FIGURE 1)
1. Shut-off engine and wait 2 minutes
before filling fuel tank.
2. Remove fuel cap and fill fuel tank
to bottom of metal filler neck;
about 1-3/8 inch [3.5 cm or 35 mm]
from top of filler neck opening.
3. Do not overfill fuel tank. Overfilling
may damage roll-over valve and
carbon canister.
4. Reinstall fuel cap; make sure to
rotate cap clockwise unit it stops.
STARTING
1. Remove all electrical loads from the
generators.
2. Rotate fuel petcock valve lever,
located on underside of fuel tank,
to the vertical position to open
valve.
3. Flip engine toggle switch (on
control panel) to the ON position.
4. The engine is equipped with an
automatic choke. However, the
choke mechanism has a manual
override feature for extreme cold
weather starting. For extreme cold
weather starting, pull choke wire;
after engine warms, push choke in
to it's normal operating position.
5. Pull the starter rope with a brisk,
smooth motion.
6. After each start up, allow the
engine to run for 2-3 minutes with
no load.
Engine speed is
preset to provide
proper output voltage. Never attempt
to modify or adjust engine speed or
output voltage.
ENGINE BREAK-IN
After initial start-up, the engine
should be broken in according to the
manufacturer's instructions. Refer to the
engine manual for the proper break-in
procedure.
SHUT-OFF
1. Shut off and remove all electrical
load devices from the generator.
2. Allow the engine to run for 2-3
minutes with no electrical loads.
3. Flip the engine toggle switch (on
control panel) to the OFF position.
4. Verify that the generator has
completely stopped.
5. Rotate fuel petcock valve lever,
located on underside of fuel tank,
to the horizontal position to close
valve.
6. Allow the unit to cool before
installing any covers.
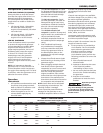
TABLE 1 - ESTIMATED POWER USAGE (WATTS)
LOAD DEVICE WATTS LOAD DEVICE WATTS LOAD DEVICE WATTS LOAD DEVICE WATTS
Air conditioner 2000-3000 Electric drill
(large)
500-1000 Radio 50-200 Toaster 900-1700
Automatic
washer
150-1500 Fan 40-200 Refrigerator 190-2000 Vacuum cleaner 200-300
Brooder 100+ Freezer 300-500 Skillet 1200 Water pump 1000-3000
Clothes dryer 5000-10,000 Hot plate 330-1100 Space heater 600-4800 Water heater 1000-5000
Coffee maker 400-700 Iron 500-1500 Sump pump 400-3000 Small hand saw 1000-2000
Electric drill
(small)
225-1000 Light bulb AS RATED Television 200-500 Large hand saw 1500-2500
Figure 1
1-3/8 inch [3.5 cm or 35 mm]
Gasoline Fill Level