


48
Installation & Operation Manual
6 Startup
Set clock
The SMART SYSTEM control has a built-in clock that it uses
for its night setback feature and for logging events. This clock
must be set when the appliance is installed, and anytime the
appliance has been powered off for more than one month. Use
the following procedure to set the clock:
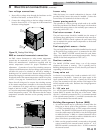
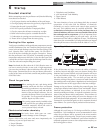
1. Press and hold the MENU key (FIG. 7-1) for at least 5
seconds.
2. The display changes to ready “ENTER MENU CODE”,
with four (4) zeros below it.
3. Change the zeros to match the user code (factory set at
“0704”). Use the UP and DOWN keys to increment or
decrement the flashing digit, and the NEXT and
PREVIOUS keys to select which digit flashes.
4. Press the ENTER key.
5. The display changes to read USER CODE for a few
seconds, then displays a menu.
6. Press the ENTER key.
7. Press the UP key twice to display “A3 DATE AND
TIME”.
8. Press the ENTER key once.
9. The date and time are displayed as “YY:MM:DD W
hh:mm”, where:
mm: minutes
hh: hour (24 hour time; e.g., 2:00 PM = 14:00)
W: day of the week (1 = Sunday, 2 = Monday,
3 = Tuesday, etc.,)
YY: year
MM: month
DD: date
NOTICE
The internal clock does not adjust for
Daylight Savings Time and therefore, will
require a manual adjustment.
Use the UP and DOWN keys to increment or decrement the
flashing number, and the NEXT and PREVIOUS keys to select
which number flashes.
10. Press the ENTER key to save the setting.
11. Press the MENU key twice to exit the Programming
Mode.
Configuration of the cascade
When installed in a Cascade system, the individual controls must
be programmed for cascade operation. This is accomplished by
accessing the control parameters.
Input the Installer code as described in the Copper-fin
2
Service
Manual. Once the control parameters have been accessed, use
the DOWN arrow key to select the H Control Mode parameters.
Press the ENTER key to access these parameters. Use the UP
arrow key to access parameter H4 Cascade. Press the ENTER
key to access this parameter. Use the DOWN arrow key to select
Enable. Press the ENTER key to program this into the control.
Press the EXIT key, then press the DOWN key until I Cascade
is selected.
Press the ENTER key to select the parameter I1 BLR Address.
Press the ENTER key to access this parameter. Each unit in the
Cascade system must be programmed with its own address.
The unit designated as the Leader will have an address of 0.
The remaining units in the Cascade will be Members and have
addresses from 1 - 7. Use the UP and DOWN arrow keys to
select the appropriate address. Press the ENTER key to program
this into the control.
Press the MENU key twice to exit the control parameters. Repeat
this procedure for all appliances in the Cascade, designating the
Leader control and the Member controls.