


46
Section 5: Maintenance & Lubrication
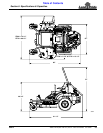
ZT60i & ZT72i (S/N 748110+) Accu-Z
®
Zero Turn Mowers 357-552M
Table of Contents
2/06/14
Mower Blade Maintenance
Blade Inspection
Check mower blades daily, they are the key to power
efficiency and well groomed turf. Keep them sharp as a
dull blade will tear rather than cut grass, leaving a brown
ragged top on the grass within a few hours. A dull blade
also requires more power from the engine.
Replace any blade which is bent, cracked, or broken.
!
WARNING
DO NOT try to straighten a blade that is bent. Never weld a
broken or cracked blade. ALWAYS replace with a new Land
Pride blade to assure safety.
!
DANGER
Never work with blades while engine is running or with blades
engaged. Always push blade engagement switch down (OFF),
move both control levers to neutral and then fully (OUT), set
park brake (ON), and turn engine (OFF). Block up mower
when you must work under it. Wear gloves when handling
blades. Always check for blade damage if mower should strike
a rock, branch, or other foreign object during mowing.
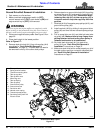
Blade Removal
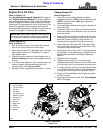
Refer to Figure 5-15:
1. Remove mower blade (#4) by grasping blade end
with a rag or thick padded glove while loosening
blade bolt (#2) with a 3/4" wrench.
2. Remove 1/2" blade bolt (#2), blade washer (#3) and
mower blade (#4) from spindle assembly (#1).
3. Continue with “Blade Sharpening” on this page.
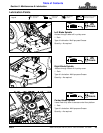
Blade Removal & Installation Illustration
Figure 5-15
IMPORTANT: Blade mounting bolts have right hand
threads. Turn blade bolts counterclockwise to loosen
and clockwise to tighten.
33813
Cutting Edge
2
Blade Sharpening
!
DANGER
Keep blades balanced when sharpening. An unbalanced blade
may come loose and fly out from under the deck. Also, an
unbalanced blade will shorten the spindle bearing’s life.
!
CAUTION
ALWAYS wear eye protection and gloves when sharpening a
blade.
1. Clean blade, blade washer and mounting surface of
all debris before inspecting blade and sharpening.
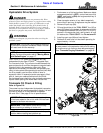
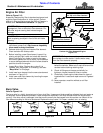
Refer to Figure 5-16:
2. Lay blade on a flat surface and check blade to make
sure it is not warped. Replace any blade that is
warped.
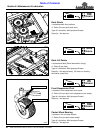
Comparison of Warped & Straight Blades
Figure 5-16
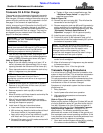
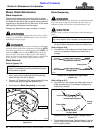
Refer to Figure 5-17:
3. Lay blade on a flat surface and check both ends of
blade to make sure it is not twisted. Replace any
blade that is twisted.
Comparison End View of Twisted & Straight Blades
Figure 5-17
4. Check blade cutting edge. Replace blade if nicks are
severe. Blade may be sharpened if cutting edge is
dull or slightly nicked.
NOTE: Care should be taken in order not to remove
any more material than necessary to sharpen blade.
24579
Warped Blade (Replace)
Straight Blade
Cutting Plane
24579
Cutting Edge
Cutting Edge
Twisted Blade (Replace)
Straight Blade
Cutting
Plane